Monday, April 27, 2009

Preparing for a Pandemic

With all of the events happening around the world right now, I thought it would be useful to post about preparing for a pandemic. What is a pandemic? What is an epidemic?

Epidemic: An epidemic is defined by an illness or health-related issue that is showing up in more cases than would be normally expected.
Pandemic: A pandemic is an epidemic disease that spreads to other communities usually beyond national borders.

This morning on the national news they reported that the "Swine Flu" has been spreading rapidly throughout Mexico. It has been found and diagnosed in New York City, as well as 5 other states. Although nobody has died in the US, the government has put the USA on "alert". Sometimes we think that a pandemic couldn't happen, but in reality, it could.

What is the Swine Flu?: "Swine flu is a respiratory disease of pigs caused by a type A influenza virus that regularly causes outbreaks of influenza among pigs. Swine flu viruses do not normally infect humans; however, human infections with swine flu do occur. Public health officials have determined that this strain of swine flu virus spreads from human to human and can cause illness." CDC

Part of our storage should contain things that would help protect us from a pandemic:
  • N95 medical masks - at least 3-5 per person. "95" means that they keep out 95% of the airborne particles. Cheapest if ordered online: Amazon.com, Samsclub.com, Walgreens, etc. Also available in medical supply stores and in pharmacies. These will disappear quickly from the shelves in a pandemic.
  • disposable vinyl, nitrile, or latex gloves or other reusable gloves that can be disinfected
  • household bleach
  • liquid hand soap
  • hand sanitizer (enough so everyone can have their own)
  • disinfectant wipes
  • Lysol® or Clorox® disinfectant
  • kleenex tissues
  • trash bags (plenty as there may be limited trash pickup)
  • laundry detergent (if someone in your family is ill, you will be doing plenty of washing)
  • paper towels
  • toilet paper
  • disposable diapers for infants
  • a supply of your prescription medications, nonprescription drugs, and other health supplies, including pain relievers, stomach remedies, cough and cold medicines, fluids with electrolytes, vitamins, rubbing alcohol, thermometers
  • have a 3-month supply of food at home
  • food for the flu (white rice, jell-o, pedialyte for kids, sprite, 7 -up, etc)
Handwashing will be the greatest deterrent of any illness. Learn how to and teach your family how to wash correctly:
  1. Use very warm, running water and soap (an antibacterial soap is best).
  2. Scrub both sides of the hands for about 20 or 30 seconds.
  3. Pay close attention to under the fingernails and around the hair follicles at the bottom of each finger and on the back of the hands.
  4. Rinse well with very warm, running water.
  5. Dry hands with a disposable paper towel.

Hands should be washed:

  • After using the toilet
  • After changing diapers, (wash the hands of the diapered child too)
  • After helping a child at the toilet
  • Whenever hands come in contact with body fluids, including vomit, saliva and runny noses
  • Before fixing or eating food
  • After touching raw meat, poultry, fish or eggs
  • After meals and snacks


Sunday, April 26, 2009

Paying for Food Storage

As I look around and see friends who are struggling because loss of jobs, etc, it makes me even more appreciative of food storage. However, the #1 excuse for not having a year supply of food is "It just costs too much" or "I don't have enough money." Does obtaining a year supply of food totally freak you out financially? It sure doesn't have to.

Food storage is anything that you are not eating right now. Anything in your pantry is food storage. Anything in your freezer is food storage. Anything in your "food storage room" is food storage.

Here are some ideas that have helped our family:

1. Do not buy your food storage all at once. Most families would not be able to afford that! How do you eat an elephant? One bite at a time. Absolutely do not go into debt for food storage.

2. Each week, grocery stores have "loss leaders" on their ad. These are generally 1-5 items that lure you into the store. These items will be on sale for less than what the store pays for it. The idea of loss leaders are to get you into the store, in hopes that you will buy lots more while you are there. When an item is a loss leader, buy your year supply of that item. For example, when ketchup was on sale for .59 cents, I bought 12 bottles of it. That cost me only $7.00 (not a huge increase of my budget for the week), and now I have my year supply of that item. Often times, I would buy 3-4 loss leaders per week, buying the whole year supply of that item.

3. Make goals for your long term storage (beans, rice, flour, oats, wheat, powdered milk, etc). I would make a goal for the month. For example: This month I am going to get 1 five gallon bucket full of wheat (about $8), one bucket of rice, and one bucket of oats. These are very attainable goals. I have found that the LDS cannery usually has the best price on wheat, oats, beans and powdered milk. I have found rice and flour cheaper at Sam's and Costco.

4. Use 5 gallon buckets for wheat, beans, rice, flour, & oats. Did you know that most bakeries will give you their used icing buckets (usually 4-5 gallon buckets) for free? I got all of my buckets (except for two that I already had) for free. Reams in Springville, UT, and Buy Low Market in Provo, UT love to give you buckets for free. A couple of other bakeries wanted to charge $1. Just call around and see who will give them to you. Do NOT use 5 gallon buckets for powdered milk. I only store milk in #10 cans. I do buy gamma lids for my buckets. These are lids that snap on but twist on and off. They are airtight, but MUCH easier to get into. They are expensive (but worth it) at about $6 per lid. Make sure you number each of your buckets as you fill them. When you have your year supply of that item, you should only have one bucket open at a time. When that bucket is gone, refill it, and start on the next numbered bucket. This way you are always using the oldest first. This idea came from my friend Vanessa. Thanks Vanessa!

5. Coupons. I have started couponing and seriously can't believe how much I am saving. Just think, if you save say $50 per month with coupons, you have an extra $50 that month for food storage. That would fill a few 5 gallon buckets.

6. Only buy items on sale. Stores cycle their ads about every 3 months. If you buy at least a 3 month supply of an item when it is on sale (preferable a year supply), then you won't have to buy it again until it is on sale again.

7. Food Storage Date Night. Instead of going on your regular date for the week, do a free date and use the money saved for food storage. If you forego only one date a month (dinner and a movie), you could easily have an extra $50-60 for food storage.

8. Tax Returns. This is the perfect time of year to use some of that tax return for food storage.

9. Store brands. Often times store brands can save you big. However, make sure that you buy one or two cans/boxes/bottles first to make sure you like them. No sense saving money on food you don't necessarily like.

10. Canning. When you find a great deal on meats, buy a bunch and pressure can it (future post). When boneless/skinless chicken breast is on sale, I buy 40-80 pounds and can it. Same with pork, hamburger, steak, etc. Canned meat is a great thing to have in your food storage. Do the same with fruits (apples, pears, peaches) and vegetables (beans, beets, etc). Last year I went to the fruit orchards and bought boxes of 2nd quality apples for $5 per box. One box did 14 quarts of applesauce!

11. Your food storage is an extension of your pantry. It is nice to be able to "shop" in your food storage room for the items you need. Take is slow. Take it steady.

12. Ask for food storage for Christmas or birthdays. The peace of mind we receive from having our food storage outweighs many of the other things we could receive.

13. Plant a garden. For several dollars you can get seeds to plant enough produce to feed your family.

14. Eat at home. This alone can save so much money- which can be put towards food storage. Not to mention much more nutritious.

15. Know that the Lord will bless you as you endeavor to build your food storage.

Tuesday, April 21, 2009

Garden Plan 2009

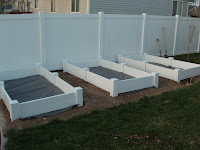
After much consideration, planning, and hard work, our new square foot gardens are ready to plant! Yippee!

Because things took a bit longer than we thought, I am afraid that our "cool weather" crops are going to have a very short growing season. Darn! The good thing is, as soon as those crops are harvested, in goes more warm weather plants! After the peas are harvested, here comes acorn squash!

This year I decided to plant large amounts of beans, both pole and bush. The bush beans tend to come on at the same time, perfect for canning! My kids for some reason don't like fresh beans (they claim they are hairy!), but they loved canned, so out will come the pressure canner. The pole variety will give me fresh beans all season. Yummy!

I was a bit worried that with the square foot garden we wouldn't be able to plant as much. As I have been figuring out my plan, I am astounded at how many plants I can have! Hopefully it will turn out as planned. I even ventured out and will plant a couple things I have never before planted: garlic and eggplant!

Carrots (16) Beets (16) Beets (16) Pole beans (8)

Lettuce (4) Romaine Lettuce (4) Red Leaf Beets (16) Cantaloupe (1)
Carrots (16) Beets (16) Beets (16) Pole beans (8)

Lettuce (4) Romaine Lettuce (4) Butter Beets (16) Cantaloupe (1)
Carrots (16) Eggplant (1) Eggplant (1) Pole beans (8)

Pepper (1) Pepper (1) Pepper (1) Cantaloupe (1)
Onions (9-16) swiss chard (4) swiss chard (4) Pole beans (8) Trellis
Pepper (1) Pepper (1) Pepper (1) Cantaloupe (1) Trellis
Onions (9-16) swiss chard (4) swiss chard (4) Pole beans (8)

Jalepeno (1) Jalepeno (1) Jalepeno (1) Peas (8)/ winter squash
Onions (9-16) Spinach (9) Spinach (9) Cukes (2)

Jalepeno (1) Anaheim Pepper (1) Anaheim Pepper (1) Peas (8)/ winter squash
Onions (9-16) Spinach (9) Spinach (9) Cukes (2)

yellow beans (9) yellow beans (9) Marigold Peas (8)/ winter squash
Marigold

Cukes (2)

Garlic (4) Garlic (4)
Peas (8)/ winter squash

Bush beans


Bush beans Zucchini
Bush beans


Bush beans


Bush beans
Yellow squash

Bush beans


Tomato (Roma-D) Tomato (Roma-D)


Tomato (super Fantastic-I) Tomato (super Fantastic-I)


Tomato (Better Boy-I) Tomato (Better Boy-I)


xx xx House (East)


Tomato (sweet 100) Tomato


Tomato (Better Boy-I) Tomato

Sunday, April 19, 2009

Building a Food Storage Program

"Food storage is good, in that it provides a personal buffer against outside forces (economic, natural, political, etc.). But, it must also be placed in proper perspective. It is a resource and a resource should be wisely managed. Like any other resource it should be kept in balance with other resources. It has never been a wise practice to “rob Peter to pay Paul” or to deplete one resource at the sacrifice of another. When effort is steady and consistent it engenders knowledge and familiarity of the topic thus integrating it into one’s life. For this reason it is not wise to spend a concentrated effort of time and money on food storage in order to simply check it off one’s list of things to do. The more time and effort spent on the project the more the project will become a part of everyday life, practical and useable.

1. Avoid going into debt. This is “robbing Peter to pay Paul” and may create a situation much more serious than not having “food stored for a time of emergency.”

2. Budget all expenses for the household and include a food storage budget.

3. Change the mind set from food storage only in time of disaster to food providently used daily. If the food is not to be eaten immediately, it is food storage. Purchase food to increase the amount stored. Purchase food to manage one’s own storage program. Purchase food in accordance with personal and family tastes, habits, lifestyle, age, etc.

4. Allot an amount each shopping trip to increase storage amount (since food storage is being rotated and used daily—that means 80% of the food dollar should be going for food storage); therefore, use wise shopping strategies on every shopping trip.

A. Shop with a plan and with a list—use the list of foods generated in the “How to Store What You Use” section.

B. Compare prices:
1. Compare the price of one brand to another. Try out new brands before purchasing in quantity to ensure the quality is acceptable to your household and will be eaten.
2. Compare the price of one size package to another. Divide the size of the package into the price and compare the price per unit of different packages.

A. Shop sales—Be cautious of shopping several stores and risking impulse buying at each store. Sometimes the 50 cents saved may cost $5.00 more in the long run
1. Compare price of sale item to non-sale item—is it really less expensive?
2. Do not be persuaded to purchase an item just because it is on sale.
3. Be cautious using coupons, they are used to encourage sales for the store or the manufacturer.

D. Buy foods in season.
E. Buy two items when one is needed.

4. Shop in quantity or bulk—but with wisdom:
A. Be sure quantity will be used before spoilage occurs or quality deteriorates.
B. Be sure quality of bulk item is high quality. Food will never be any higher in quality than the day you purchase it.
C. Use wisdom when purchasing at bargain stores, discount stores, salvage stores, warehouses, etc. Items sold at these stores may be lower priced due to poor quality and safety. If the food is discarded later or causes illness, the bargain price will not be worth the cost. (Even after following the guidelines below the quality of the product inside the package may not be acceptable.)
1. Check expiration dates—old items do not store well.
2. Check quality of packaging for tears, openings, exposed product, signs of leaking, soiling, excessive dirt, etc.
3. Check for signs of pest infestation.
4. Check for signs of temperature abuse—frozen packages are distorted, warped or have large ice crystals; items which should be loose are frozen into a solid clump; frost build up; freezer burn, etc.

D. Reject cans with dents on the seams, dents on the seal, dents large enough to hold at least one finger, cans with bulging lids, signs of leaking, rust, etc.

6. Ways to “increase” available money for food storage:
  • A. Use non-fixed income for storage such as tax refunds, gifts of money, bonus checks, rebate checks, etc.
  • B. Use entertainment money for storage by cutting back on (or cutting out) movies and movie rentals for 1 month, 2 months, etc.
  • C. Eat at home rather than eating out; cut back on snacks; use money spent on snacks such as sodas, chips, candy, munchies; develop cooking skills and cook from scratch rather than with higher priced convenience foods; pack a lunch rather than eat out.
  • D. Use vacation money by: choosing a less expensive vacation; shorten vacation time and use money saved for storage items; stay home for vacation; plan vacation wisely— lack of planning usually ends up in higher costs and less results.
7. Purchase foods from a reputable source. ..."
(Source: Utah State University Food Storage Cooking School—Low and Hendricks, USU Extension, Salt Lake County, 1/1999, pgs. 118-119. Copies may be made for individual and non-profit use as long as Utah State University Extension credit appears on each page.)

Thursday, April 16, 2009

Getting Anxious

For the past several weeks, I have been working soooo hard to get ready for gardening! In years past we have had a raised garden that had wood beams supporting it. This past year, they were almost disintigrated. The garden was falling apart!

After researching square foot gardening, I decided that I wanted to do that method! So, for several weeks, we hauled off 3 trailers full of dirt (our existing garden). The main reason that I wanted to try the SFG method was to get rid of the weeds! It seems that I am always gung-ho about gardening until the weeds start taking over EVERYTHING in my garden. Seriously, they come up like carpet. Last year I spent at least an hour each day, and still couldn't keep up. So, after the dirt was hauled off, my husband and I got to work.


Our garden area after all the dirt has been hauled away.


Supplies for the garden boxes. We ordered the vinyl material from Best Vinyl, a vinyl fence company.


The first garden box put together.


All three boxes set, leveled and weed paper put down.


I was so looking forward to mixing up the "mix" today. Unfortunately, we woke up to 6" of snow! I guess it will wait until tomorrow....


Pile of compost ready to be mixed


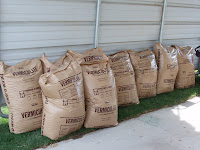
9 bags of vermiculite for the mix


4 bags of peat moss to add in


Lessons I have learned thus far about square foot gardening:

1. It is a lot of work to get going.
2. It is very expensive to get going.
3. You don't need to have your corner posts more than about 6" into the soil. We ended up sawing off the posts because it was too hard to get the holes dug in our clay soil deeper than that.

Things I am hoping for with our new gardens:
1. Weeds will be kept to a minimum.
2. I will get as much or more harvest.
3. I will not have to spend as much time gardening.

Total costs:
3 4x8 foot vinyl gardens, each 10" high: Approximately $420
Compost (1.5 cubic yards): $38
Vermiculite (9 bags, each 3.8 cubic feet): $180 plus tax
Peat Moss (4 bags, each 3.8 cubic feet-they expand to 7+ cubic feet when opened): $60 plus tax
Weed Paper: $33

Total cost: $731
Cost per garden: $244

Wednesday, April 15, 2009

Food Storage Cookbook

One of my favorite food storage gals is Crystal from www.everydayfoodstorage.net. She has a brand new cookbook coming out this week! I have been looking forward to this for a while. I have been following her blog for several months and have learned a lot from her. If you want to get some great recipes for using your food storage (that taste great!), you will want to have this book! I can't wait to order. Click here to link to her cookbook on Amazon. You can also find it at Deseret Book. Yay!

Monday, April 13, 2009

Got debt? Baby Step #2

Got debt? Join the club! Today I read an article about debt that had some statistics that were quite surprising. I thought I would share them:
  • Today’s consumer has an average of 13 debt obligations on their credit report.
  • The total amount of debt owed by Americans is more than 2.5 trillion. $8,500 per person on average.
  • 38% of the 2.5 trillion comes from credit card debt.
  • The average amount of credit card debt per card holder is $12,500 according to the Federal Reserve.
  • 74.9% of families had credit cards and 58% of those carry a balance.
Hopefully you do not fit into the categories listed above. But, if you are a "normal" American, you just might. So, what to do? Yesterday's post was on baby step #1, obtaining a beginner emergency fund of $1000. Once that is done, it is time to move on to baby step #2, getting out of debt.

Baby Step #2: Pay off your debts in order of smallest balance to largest. "Snowball" the payments as you go.

List all of your debts on a paper (or a spreadsheet if you prefer) arranged from smallest balance to largest balance. (Don't worry about interest rate unless you have two equal debts. In that case, list the largest interest rate first). Now, this is where the fun begins! This step is the hardest to complete, but probably the most satisfying. I can't even tell you the joy and peace I felt when each debt we had was finally paid in full! Most people can be completely debt free (except for their home) in 18-24 months. Yes, completely.

Start focusing on the first debt with the smallest balance. Every extra penny you can find goes to pay that balance down quickly. Do everything you can (even get a second or part time job) to reduce the first debt. Keep paying the minimum on all other debts. Once that first debt is paid and gone, then "snowball" its monthly payment: Add it to the normal payment you're making on the next-smallest debt, and focus your efforts on that next debt. It is amazing what happens when you are totally focused on this step. When that one is paid off, take that monthly payment amount and apply it toward your next debt. Each time a debt is paid off, the amount you were paying on that debt now is added on to the next debt. Make sense? Each debt that you eliminate makes the "snowball" get bigger and bigger, wiping out everything in its way.

"I’m convinced of the unstoppable potential of people when they get on fire for something."
— Dave Ramsey

You may wonder why the debts are not listed by interest rate, with the highest ones being paid off first. Dave explains: "The reason we list the debts from smallest balance to largest is to have some quick wins. Sometimes behavior modification is more important than math. This is one of those times." I personally have to agree. As we paid off each debt, we were so excited and couldn't wait to see how quickly we could get the next one paid off. It's amazing how fired up you become when you see success. Somewhat like dieting.

Remember: If you're working on this second Baby Step and some emergency arises which forces you to spend any part of your emergency fund, then immediately stop this step and return to Baby Step #1. Stay there until you've refunded your Emergency Fund in full.

It is important not to start your debt elimination on this step. If baby step #1 is not in place before starting baby step #2, this and all steps can be in serious jeopardy. We had to dip into our beginner emergency fund several times. Thankfully we had it! We were able to get through the "emergencies" without incurring additional debt, repay it, and get back on track with baby step #2. Just think how good you will feel, when those nagging debts are gone. BYE BYE.

You can find many debt snowball spreadsheets for free online. It is very motivating to see just how quick your debt can (and will!) be gone. Keep up the good work.

Saturday, April 11, 2009

Beginner Emergency Fund- Baby Step #1

How many times have your found yourself with an expense that you did not foresee? Even worse, what if you haven't budgeted for it? What if you don't have the money for it? Often times people have to turn to the old stand-by of credit cards to help them through these "emergencies".

We have been counseled to get out of debt. Hopefully everyone reading this is either
  • completely debt free
  • working extremely hard to get out of debt or
  • looking for help to get started.
Using a credit card, even for emergencies, can totally be avoided.

The way that my family squashed all consumer debt was by following Dave Ramsey's plan. For those who have not read "The Total Money Makeover", I highly, highly recommend it! I will post on each of Dave's "baby steps" to complete financial freedom. The first baby step to debt elimination (I believe that the pre-walking phase is to make sure you are paying a full tithe) is to obtain a beginner emergency fund. This fund should be $1,000.

Baby Step #1: Make minimum payments on all your bills. Squeeze your budget until you've accumulated $1,000 cash. This is your beginner Emergency Fund.

You'll never make headway in your quest to get out of debt if you don't have at least a little something to fall back on. That "little something" is called an Emergency Fund, and that's what this first $1,000 is for (or $500, if you make less than $20,000 per year). Put everything else on hold. Make only minimum payments on all your debts; take on a second job if necessary; squeeze that budget! Forego retirement-plan contributions (temporarily) if you can. Get your emergency fund together first. Get it together fast. Most people can realistically get that in 1-2 months. We had a yard sale to get ours. Amazingly, we made $900! By cutting out restaurants and movies etc for a few weeks, we were able to save the remainder.

If you already have more than $1,000 in savings, and in anything other than a retirement account, withdraw everything except the $1,000. Use these proceeds for Baby Step #2, which will be posted soon.

Once you have accumulated the $1,000 (or $500), keep it someplace where you cannot easily get at it.

It must be available, but not easily available.

It must be spendable, but not easily spendable.

Why? Because if you are like most, if the money's right there in front of you, you're going to find a way to spend it. And that's not what we want. $1000, fast.

"Sometimes," Ramsey instructs, "you have to protect yourself from you."

What is considered an emergency? Christmas is NOT an emergency. A great sale is NOT an emergency. Before spending ANY money out of the emergency fund, discuss it with your spouse, and agree that it truly is an emergency. Then, quickly replace the funds spent. You always want the full $1000 in the beginner fund.

So, grab a paper. List all the ways you can earn (or save) some extra money. Congratulations! You are on your way.


Friday, April 10, 2009

Text the savings!

Each time I check our cell phone bill, I can't believe how much is added on from dialing "411" (operator assistance). Often times on our way to a restaurant, we call to get on the "call ahead list". As usual, I dial 411 to get the phone number. Each time I would use this, it would add $1.79 plus airtime to our monthly bill- YIKES!! Two weeks ago, while out with friends, I used 411 again. Our friends gave us a little trick, that will save us a ton of money! If you text the listing you want to "google" (466453), you will get a text back within about 10 seconds. It will have the address and phone number of that listing. Better yet, it is FREE! I have been using this awesome service for the last couple weeks, and it works like a charm. Happy texting!

Wednesday, April 8, 2009

Using Powdered Milk: Sweetened Condensed; Evaporated; Yogurt etc

The best way to rotate your powdered milk, is of course to USE IT! If you are like me, you probably prefer the taste of fresh milk. Especially because right now fresh milk is quite inexpensive. You can regularly find it for under $2.00 per gallon! With that being said, however, here is what I do to stretch those grocery dollars a little more each week while rotating my powdered milk:
  • Each gallon of milk that is half empty, I add reconstituted powdered milk to it. I shake it up in the gallon, and no one knows the difference. This extends my trips to the grocery store as well, as we are only going through 1/2 the amount of fresh milk. Please don't alert my kids, (and husband) because they don't know! :)
  • EVERY time a recipe calls for milk, I use powdered. Once again, no one knows the difference. I keep a #10 can of non-instant powdered milk and a #10 can of Morning Moo in my pantry at all times. This way we are always rotating.
Did you know you can make your own sweetened condensed milk, evaporated milk, whipped topping, buttermilk, and so much more with your powdered milk (at a fraction of the cost, with all of the flavor)?

Sweetened Condensed Milk
  • 1/2 C. Hot Water
  • 1 C. Non-instant Powdered Milk
  • 1 C. Sugar
  • 1 TBS Butter
Place in blender and blend VERY well. Equals one can of sweetened condensed milk

Evaporated Milk
  • 1 1/2 C. Water
  • 1/2 C. + 1 TBS Powdered Milk
Mix well before adding to other ingredients

Quick Whipped Topping
  • 1 cup evaporated milk
  • 1/4-1/2 cup powdered sugar
  • 1 tsp vanilla
Pour evaporated milk into mixing bowl. Chill for 30 minutes. Beat for 1 minute or until frothy. Gradually add vanilla and sugar; continue beating for 2 minutes or until mixture is stiff. Serve immediately. Makes 3 cups.

If you need it to hold shape up to 30 minutes: Sprinkle 1 tsp gelatin over 2 TBS very hot water ins mall bowl; stir until dissolved. Add to evaporated milk before chilling. After whipping, cover and chill for up to 30 minutes.

(I think you may be surprised how good this is)

Buttermilk
  • Add a tablespoon of white vinegar or lemon juice for every cup of milk and let stand for 5 minutes.
Yogurt
Keeps in fridge 2 weeks
  • 2 cups warm (100 degree) water

  • 1 cup non-instant milk powder

  • 2 tablespoons unflavored yogurt

    Pour warm water into blender and turn on at low speed. Add milk powder slowly. Blend until smooth. Add yogurt and blend a few more seconds. Pour into jars or glasses. Set with one of the following methods:

    Method 1 - Place jars neck-deep in warm water. Cover pan with lid. Set on Yogurt maker and keep temperature at 100-120 degrees. Will take 4-8 hours to set up. Chill immediately.

    Method 2 - Turn on a heating pad to the medium setting. Place a folded towel over the heating pad. Set jars on towel. Cover with another towel. Let set 4-8 hours. When set, chill immediately. You can set your yogurt overnight or while you are at work. Save some of your homemade yogurt for starter.
Have fun rotating your powdered milk!

Tuesday, April 7, 2009

Powdered Milk 101

We know that powdered milk is an essential part and also the most expensive item to acquire in basic food storage. Realistically however, it starts to change flavor after a shorter amount of time (about 2-3 years). It is still safe to drink past that time, but will taste off. Therefore, it is essential to ROTATE your powdered milk! You don't want to be stuck with a year supply of powdered milk that tastes awful! So, let's look at the different types, and which is best to store.

There are 3 types of powdered milk: Instant, Non-Instant, and Milk Alternative (Morning Moo or equivalent). Let's look at each one individually-

Non-Instant: This is the type of milk that you can purchase at the LDS cannery. It is harder to find in the grocery store. Non-instant nonfat dry milk is made of fresh, pasteurized milk from which the water and fat have been removed. Nutritionally, it includes all the protein, calcium, and B vitamins found in fresh milk. It is generally less expensive than fresh milk, needs no refrigeration, requires little storage space, and is always available and ready to use in your food storage. The non-instant variety is more compact and requires less storage space than the instant variety, but it is more difficult to reconstitute and does not mix easily for drinking purposes.

Instant: Both Instant and Non-instant powdered milk are made from milk in a spray-drying process, but the instant variety has been given further processing to make it more easily soluble in water than regular dry milk. Both types have the same nutrient composition. The most easily found variety is the instant, available in nearly any grocery store. However, because more air has been added into the instant variety, you will often need to use double the amount of instant powdered milk to get the same results as non-instant. Look on your label for reconstitution amounts.

Milk Alternative (Morning Moo): Morning Moo (MM) is made from sweet dairy whey, non-fat dry milk solids, partially hydrogenated vegetable oil, Vitamin A, and Vitamin D. A #10 can of MM will store up to 10 years (or more) if kept at 55 degrees or lower. This can be used in place of any recipe that calls for milk, or powdered milk. However, it does have a shortening effect on some recipes, so if you are using it in a recipe with shortening, you can decrease the amount of shortening. I have used it in breads, rolls, soups, etc and the results have been fantastic. It makes biscuits very flaky!

Reconstituting Powdered Milk:

For Non-Instant Powdered milk (LDS Cannery):
Amount of Milk Water Powder
1/4 cup 1/4 cup 2 teaspoons
1/2 cup 1/2 cup 4 teaspoons
1 cup 7/8 cup 3 tablespoons
2 cups 2 cups 1/3 cup
3 cups 3 cups 1/2 cup
1 quart (4 cups) 3-1/2 cups 2/3 cup
2 quarts 8 cups 1-1/3 cups
1 gallon 3-3/4 quarts 2-2/3 cups

For Instant: Check the label as each brand can differ. Generally, it takes up to twice the amount as non-instant.

Baking with Powdered milk:
In cooking, powdered milk performs flawlessly. It can be substituted for fresh milk in just about any recipe with excellent results. I try to cook with powdered milk exclusively. This is a smart use of resources because the results are so good! When baking with powdered milk, add the dry milk to the dry ingredients, and the water to the wet ingredients. Reconstituting is not necessary.

Powdered Milk & Home Storage Q & A

The following questions and answers are from the LDS Church’s provident living website.

What kind of milk is best to store?

Nonfat milk, either regular or instant, stores well when packaged properly and kept at room temperature or cooler. In the past, many felt that non instant milk would store better. There is little difference in shelf life between instant and non instant powdered milk.


What are the best containers?

Milk stored in airtight, low oxygen packaging has been found to last longer and retain a fresher taste than milk stored in boxes or plastic bags. (I think that #10 cans are the ONLY way to store powdered milk).


How long can powdered milk be stored?

Optimal storage life on nonfat dry milk stored at room temperature is three years before the milk begins to taste stale. However, when stored at cooler temperatures, it can be kept much longer. [With this in mind you should either freeze your powdered milk, or buy it in the fall and rotate it yearly.] You can rotate powdered milk by using it yourself or by giving it to others who will use it.


How much powdered milk should be stored?

Guidelines for quantities of dry milk to store are found in the 1978 booklet published by The Church of Jesus Christ of Latter day Saints called Essentials of Home Production and Storage. The booklet recommends that members store an equivalent of 300 quarts (about 75 pounds) of dry milk per person per year.

However, since that time, a U.S. government study on nutritional adequacy during periods of food shortage has recommended 64 quarts, or 16 pounds, per family member per year. Equivalent to approximately one glass of milk a day, that amount will maintain minimum health standards. Keep in mind, however, that children and pregnant or nursing mothers will require more than the minimum amount of stored milk. Families who opt to store only the minimum 16 pounds of milk per person should also increase storage of grains from the recommended 300 pounds per person to 400 pounds per person to compensate nutritionally for the smaller amount of milk.


What should I do with milk that is past its prime shelf life?

Milk develops off flavors as it ages. However, it still retains some nutritional value, and unless spoilage has occurred from moisture, insects, rodents, or contamination, it is still safe to use.


What can be done with milk that is too old to drink?

It is important to rotate dry milk. Older dry milk may no longer be suitable for drinking, but it can be used in cooking as long as it has not spoiled. If powdered milk has spoiled, it can be used as fertilizer in the garden!

Shelf Life for optimum taste (although the milk will last much longer!)

Stored at:
40°F or below: 2-4 years
70°F or below: 12-24 months
90°F or below: 3 months.

With this in mind you should either freeze your powdered milk, or buy it in the fall and rotate it yearly.

Katie's opinion: I have both non-instant & instant powdered milk and Morning Moo in my food storage. I keep equal amounts of both. I use and rotate them all.

Powdered milk is one of the few things that I do store in #10 cans. Because it can change flavor so quickly, I think it is worth the extra money to store it in cans. That way, I am not opening a 5 gallon bucket and exposing it to oxygen. I can realistically use a #10 can quick enough before it spoils. I also keep a #10 can in my pantry at all times for baking and drinking. To improve the flavor of non-instant powdered milk, you can add a tiny bit of sugar and vanilla. It actually makes it quite good! With whatever type you choose to store, if you are going to reconstitute it, make sure you let it sit in the fridge overnight. Give your family a taste test, and you may be pleasantly surprised!

Sunday, April 5, 2009

Saving money at the Dentist

For many of us who are self employed, we do not have the luxury of dental insurance. This becomes a problem whenever we take the family to have our teeth cleaned. For years, we would take our children to our local dentist every 6-8 months for routine cleanings, sealants, x-rays etc. Each time we went, our bill was over $500! That added up to over $1000 per year. A friend of mine who is a Dental Hygienist shared the BEST KEPT SECRET about saving money at the dentist. She told me about Salt Lake Community College Dental Hygiene School!! (There are many Dental Hygiene schools that do the same thing- just google "Dental Hygiene Schools" in your area). For the last 3 years, we have faithfully gone to the college where the students perform the dental services. Each procedure is checked off by the professor, and honestly, I feel we get a much better cleaning there, than at the regular dental office. At the end of the visit, the dentist comes in and goes over everything with you as well. The one drawback is that we are there for about 2 1/2 hours. Yes, they are a bit slower, but well worth the price. If you do happen to have a cavity, they give you the x-rays to take to your dentist. They don't fill them there.

The TOTAL COST for my family of 6 is only $15.00!!!

This includes x-rays, cleanings, sealants, flouride treatments, toothbrushes, toothpaste, floss, and Crest mouthrinse. My husband even had a procedure of rootscaling that would cost $600 at the dentist. Yes, this was included in the $15.00.

For us it is definately worth the 45 minute drive, and the 2+ hour visit.

Food Storage FAQs

Where do I start?

Start by adding a few storable items that you typically eat, storing some water that is safe to drink, and saving some money, if only a few coins each week. Then over time, expand these initial efforts—as individual circumstances allow and where permitted—by storing a longer-term supply of basics such as grains, beans, and other staples.

How quickly should I obtain my food storage?

It is not prudent to go to extremes or go into debt to establish your home storage all at once. Gradually build reserves over time as financial resources and space permit.

What’s the difference between the three-month and longer-term supply items?

Three-month supply items are foods that you normally eat, including canned and commercially packaged foods. Longer-term supply items are basic food items like grains and beans that have very low moisture content (about 10% or less), can be stored for long periods of time (20–30 years), and would sustain life if nothing else were available to eat. A portion of longer-term supply items may be rotated into the three-month supply.

Can longer-term products really store for 30 years or longer?

Yes. Properly packaged, low-moisture foods stored at room temperature or cooler (75°F/24°C or lower) remain nutritious and edible much longer than previously thought according to recent scientific studies. The studies, which are the first of their kind, increase the estimated shelf life for many products to 30 years or more (see chart for new estimates of shelf life). Previous estimates of longevity were based on “best-if-used-by” recommendations and experience. Though not studied, sugar, salt, baking soda (essential for soaking beans) and Vitamin C in tablet form also store well long-term. Some basic foods do need more frequent rotation, such as vegetable oil every 1 to 2 years.

While there is a decline in nutritional quality and taste over time, depending on the original quality of food and how it was processed, packaged, and stored, the studies show that even after being stored long-term, the food will help sustain life in an emergency.

Food New "Life Sustaining" Shelf-Life
Estimates (In Years)
Wheat 30+
White rice 30+
Corn 30+
Sugar 30+
Pinto beans 30
Rolled oats 30
Pasta 30
Potato flakes 30
Apple slices 30
Non-fat powdered milk 20
Dehydrated carrots 20

What containers are suitable for longer-term storage of dry products?

Recommended containers for longer-term storage include #10 cans (available at Church home storage centers), foil pouches (available through Church Distribution Services), and PETE bottles (available commercially). Visit www.providentliving.org for additional information on recommended storage containers.


Source: www.providentliving.org

Saturday, April 4, 2009

Grocery Shopping- the SMART way!


I wanted to share two experiences with grocery shopping that I had today.

First, how would you feel if I told you that all of these groceries cost a total of $24.26? Woo-hoo!! Last month I started saving a ton at the grocery store. I learned how to combine what is on sale at the grocery store with coupons from the Sunday paper.

I am a believer!!


The website is www.grocerysmarts.com. If you live in Utah, the passport is g84ccl. It is a free website that rates what is on sale that week from 1-5 stars. Four and 5 stars are really worth stocking up on. It also tells you which coupon(s) to use, and where to find them, to get an even better deal. So, with my trip to Albertsons today, this is what I got:
  • 6 boxes Post cereal (Shredded Wheat, Grape Nuts, Honey Bunches of Oats)
  • 4 lbs Imperial margarine
  • 4 lbs ham
  • 3 lbs hand trimmed chicken breast
  • 1 bottle A & W diet rootbeer
  • 1 24 pk of tostada shells
  • 10 Lipton side dishes (fettucine alfredo, cheesy noodles with vegetables, etc)
  • 2 cans of Glade air freshener
  • 4 Easter basket stuffers (Hershey chocolate bunnies)
  • They were out of a cereal that I would have bought two of, which with my coupons would have been free. I got a rain check for that, and will get next time.
The regular price of the groceries above was $89.82. After the coupons combined with store savings, I paid $24.26. To make it even a sweeter deal, right now at Albertson's if you buy a $300 gift card - which I did- they will add $30 on to it for free. So, really I got all of this food for free (with $5.00 more to spend before my original amount will be affected). Even Better!

Second, although I generally shop at one store, occasionally I will go to Wal-Mart to ad match what is on sale. Today, I did some ad matching and when it was time to pay, I about died at the total. It was MUCH more than what I thought it would be. I went ahead and paid, thinking to myself, "Hmm, I must have miscalculated...." When I looked over my receipt, the cashier had accidently charged me $5.00 per can of mushrooms, instead of .50 cents per can! I had bought 12 cans. So, that could have been a $60 mistake! Luckily, I caught it, and it was quickly taken care of. The lesson learned here: ALWAYS, ALWAYS check your receipts!!

By shopping with coupons, you slowly can increase your food storage. You may be spending the same amount of money at first, but you will be getting at least double the items. This is a fantastic way to start your 3 month supply.

If you want to attend a free class on couponing (this is how I learned!), or if you want to learn more, you can email Chantel at cloftin2@hotmail.com. She is awesome!

Friday, April 3, 2009

Super Fast Pizza


For years, whenever I didn't want to cook, or if my husband and I were going to go out on a date, we would order pizza for the kids. Normally we would order 2 medium pizzas, or one 16" pizza. Each time they would deliver the pizza, I would be frustrated when I wrote the check! Yes, the pizza was delicious, but was it really worth the $20-$25+ dollars when you paid for tip and pizza? Over the past year, I decided to just make my own pizza instead. When I saw the savings, I was hooked. When I tasted it, I was even more hooked. Then, when my kids started saying, "This is the best pizza EVER", I knew I was done ordering out. As of today, Domino's 16" Original Crust Pepperoni & Olive pizza is $18 (plus tax & tip), and deep dish is $19.50 (plus tax & tip). Making your own is a great way to use your food storage and save a ton of money.

So, here is a recipe I love for perfect pizza crust:

1 1/2 cup warm water
2 TBS olive oil
4 1/2 cup all purpose flour (or can use 1/2 whole wheat)
2 tsp salt
2 tsp sugar
2 tsp dry yeast

Put water, yeast and sugar in bowl. Let sit for a couple of minutes until yeast starts to bubble. Add remainder of ingredients and knead with dough hook for about 5 minutes, until dough is smooth and elastic. Note: If you are in a hurry, just put all ingredients in order listed and start kneading. When done, remove to floured board if using immediately. Or, place in bowl greased with olive oil, turn dough over to coat it, cover with plastic wrap and refrigerate until ready to use.

Makes either 2 12" pizzas or one thicker 16" pizza.

Here is how I finish it:


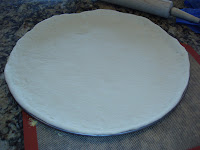
Roll out or stretch by hand.


Spray pizza pan and cover with cornmeal.


Place crust on pan.


Spread a 6 oz can of tomato paste onto crust. You can use pizza sauce or spaghetti sauce, but tomato paste is very inexpensive. Sprinkle Italian seasonsing all over crust. We like a lot.


Put toppings on. Sprinkle again with seasonings. Now, you can wrap the pizza with plastic wrap and refrigerate until ready to use, or freeze for another day. If you are ready to eat, bake it now!


Place in preheated 400 degree oven until crust is golden brown and toppings are hot and bubbly. If you have a pizza stone, follow directions for that. It makes the crust crispy and even more delicious.

Total cost of pizza"
Crust: less than $1.00
Tomato Paste: .33 cents
Cheese: $1.33 (I bought a 2 lb. loaf on sale for $3.98 and used 1/3 of it)
Pepperoni: .99 cents (I bought a 6 oz package on sale for $1.98 and used 1/2 of it)
Total cost: less than $3.65


Tip: When cheese goes on sale for $2.00 or less per pound (usually in 2 pound loafs), buy lots. I shred it in my food processor and then freeze it. Same with pepperoni. It stays in the freezer for when we need another quick pizza meal. Right now at Smith's you can buy a 5 lb bag of shredded cheddar for $7.99! That is an AWESOME price. Only $1.60 per pound!

Wheat Grass Easter Basket


With Easter in just 9 days, why not make your own wheat grass Easter basket? It is a great thing to do together with your kids or grandkids. It is fun to check each day, and watch the progress of the grass. If you are going to do this, you need to start today or at latest tomorrow!

Here are the instructions:
  • Since we only have one week to grow the grass, soak spring wheat berries in warm water overnight. Next year if you have two weeks before Easter, proceed to the next step; soaking the berries isn’t necessary.
  • Find a glass pie pan, jar, or other container, to fit inside the Easter basket. Put at least 1 1/2 inches of potting soil into the bottom of the container and spread evenly. Scatter the soil generously with spring wheat berries in a single layer, and cover lightly with soil.
  • Put the basket or container in a warm area of the house that isn't in direct sunlight. The area should have a temperature of 65 to 75 degrees. Cover it with newspaper and leave it alone for now. Every morning, spray the seeds with water and recover with the newspaper. Do not use too much water, or else the seeds could mold. The newspaper can be removed once the leaves start to sprout. In a bit over a week, you should have about 8 inches of wheat grass to use in your Easter decorations.
  • Make certain the soil remains moist at all times during germination.

For added decoration, you might wrap the basket handle with ribbons, lace, or dried flowers. Spring bulbs planted along with the wheat grass will add blooming beauty to your basket. Have fun!

Thursday, April 2, 2009

Zero-based Budget

Several weeks ago I received a phone call that I had been chosen for a "Success Story" on the Mvelopes website. Mvelopes is a budgeting program that I use to keep on track with our finances. Whatever you use for budgeting, STICK WITH IT! I truly believe that budgeting is the only way to achieve financial peace, and to avoid the debt trap. To see the story, click here. (If that doesn't take you directly to the story, click on "blog" once on the mvelopes website, then you can find it.)

This is why I decided to post on budgeting. I LOVE BUDGETING! It brings such peace and freedom! Much of this explanation of zero based budgeting comes from Getting Finances Done. It explains it so well that I wanted to share. This is the type of budgeting I have done for the last 4 years. I can promise you that financial peace can be yours with a little bit of knowledge, and a lot of doing.

One of the ways to make your budget work is to create a zero-based budget. Today’s post outlines how to create your first zero-based budget. Over the next few weeks I’ll be addressing various aspects of creating and managing a budget. Let’s start with the basics. Some of these steps may seem obvious or simplistic. But for those who just can’t seem to get a budget started, I hope to give you some step-by-step detail that will help make creating a budget easier. Are you ready?

What is a zero-based budget?

A zero-based budget is one where your total income minus your total expenses equals $0. In other words, it forces you to assign every dollar of income to an expense (or savings) category. As Dave Ramsey puts it, you’ll be “spending your month’s income on paper” before you spend it in real life.

Benefits of a zero-based budget

Using a zero-based budget and properly dealing with the difference from month to month will allow you to gain total control over every dollar you spend. If you get a bonus or spend less than you planned during the month, you can easily redirect that money where you really want it instead of letting it dissipate through unfocused spending.

A word about spreadsheets

I highly recommend using a spreadsheet to do your initial budget because it’s very easy to calculate amounts and rearrange the order of items. If you don’t have Excel, you can download the free Open Office CALC spreadsheet software or use a free online spreadsheet like Google spreadsheets. Simply using paper and pen is OK too. If you do, you may need to re-write it a couple of times and be sure to double check your calculations.

When first starting your budget I would NOT use the budgeting tools in Quicken, MS Money or other automated tools. You may be able to use those tools effectively once you have a solid hold on your budget, but for now it’s best to make your budget by yourself so you know every nook and cranny. That way you’ll be less likely to make errors due to not understanding how an automated tool is built. You will also be more likely to use a budget if you create it yourself. Once you have a high degree of confidence that your budget is working properly, feel free to experiment with pre-built tools and spreadsheets like mint.com, or my favorite, mvelopes.com.

Preparation: Get out those statements

Before you get into the thick of things, you’ll want to do a little preparation by collecting the following:

  • Pay stubs
  • Records for other income such as bonuses, gifts, and tax returns
  • Copies of your recurring bills
  • If you track expenses in Quicken or MS Money, print out monthly reports of your expenses for the last few months
  • If you use checks regularly, it may be useful to have your check register on hand

Agree to be civil

Now take a few deep breaths. If you are doing this with a spouse, agree to be civil. Ask yourself “how can I do this and enjoy it?” As you go through the initial steps of allocating, don’t nit-pick too much. If one person wants to budget funds for a category and the other disagrees, let them budget the funds and you can go back later and adjust once you know if you’re over and by how much.

If this tends to lead to contention, just work on it for a set amount of time (15-30 minutes). Doing small bits at a time over a period of several days will lead to getting done without too many problems with your spouse.

Step #1: Write down all your sources of income for the month

Let’s get started. If you have a fixed paycheck once or twice a month, this step will be easy. Just write down how much you make every month. If your finances are really tight, you should do a budget for each paycheck to ensure you have the funds on hand to pay bills that occur in that time period.

If you are self employed or have an irregular source of income, you’ll want to wait until you get an actual check and then follow this process for just that check. In the meantime, you can follow this process for the money you have available in your bank account. Just use your balance as the income. For example, if your bank account balance is currently $3,000 then put that amount as your income. As we go through this process you’ll be allocating how you’ll use that $3,000 until your next paycheck.

Do I put down net or gross income?

It really doesn’t matter if you put down net or gross. If you use gross (the amount before taxes, insurance, etc that are automatically deducted from your paycheck) you need to be sure to include the categories and amounts that are automatically deducted from your paycheck in your budget. I prefer using net so that I don’t need to write the extra expenses down every month. Because taxes and insurance are the same from month to month I prefer to simply check the amounts every quarter or so to make sure everything is still the same. It’s more efficient to track them separately.

Of course, if you’re self employed, be sure to allocate for paying taxes.

Step #2: Write down a list of expenses

Write down a list of all the expenses you expect to have this month. I’ve included a list of possible expenses below to prompt your memory. Be sure to include expenses unique to only this month. Do you have a friend or family birthday? Is your registration due? This step may actually unearth some expenses that you forgot about. If you think of expenses that are coming up but not in this month, that’s ok, just go ahead and write them down and we’ll deal with them a little later.

  • Income
    • Paycheck 1
    • Paycheck 2
    • Other Income 1
    • Other Income 2
  • Expenses
    • Taxes (if using gross income or you are self employed)
    • Mortgage Payment
    • Second Mortgage payment
    • Household (yard)
    • Utilities: Gas
    • Utilities: Elect/Water/ Gar
    • Auto: Gas
    • Auto: Insurance
    • Auto: Maintenance
    • Auto: Registration
    • Satellite TV
    • Life Insurance
    • Debt reduction
    • Babysitting
    • Clothing
    • Grocery
    • Grocery: Eat Out
    • Grocery: Eat Out
    • Grocery: Nonfood
    • Medical
    • Hair cut/personal care items
    • Charitable Donations
    • Emergency Fund
    • New car savings
    • College Fund
    • Dry Cleaning
    • Gifts: Birthdays
    • Gifts: Christmas
    • Gifts: Holidays and Other
    • Household: Maintenance
    • Retirement Savings
    • Magazine Subscriptions
    • Entertainment: Dates
    • Entertainment: Video rentals
    • Personal money (1 for each individual)
    • Cushion

You’ll probably miss an expense or two at first and find yourself part way through the month saying “shoot, I forgot to budget for that.” To address this scenario, be sure to budget a “cushion” account. I recommend starting at about $100 at first. Over time, you’ll be able to get a feel if this is too much or not enough.

Include savings and debt reduction in expenses

When I say “expenses,” I really mean “funds that will be spent or allocated to other purposes.” Saying “expenses” is just so much easier. Include any savings allocations, debt reduction payments, or any other monetary outflows in your expense list.

Step #3: Identify your expense types

For this step, simply go through all the expense categories and mark if they are fixed, semi-fixed, or variable. Just write an “f,”"s-f,” or “v” next to the category (or in another column if using a spreadsheet). Fixed expenses are those that don’t change from month to month like your cable bill. Semi-fixed expenses are those that may vary slightly from month to month like a phone bill. As a rule of thumb, semi-fixed expenses shouldn’t vary more than $10 in a month. Variable expenses are those that vary from month to month more than $10 like groceries or gas expenses.

Step #4: Allocate your fixed and semi-fixed expenses first

The reason we marked each expense type was to determine the order to allocate them in. First allocate your fixed and semi-fixed expenses. I recommend doing this simply because it’s easy. Your fixed expenses will probably include your largest expenses, such as your mortgage, so it will be easier to deal with the smaller amount left over. Plus, most of your fixed expenses are probably not very negotiable without dramatic lifestyle changes or disruptions so they give you a sort of “hard landscape” around which you will fill in the variable expenses.

Once we are done allocating all our expenses, we’ll circle back and see if we want to eliminate one or more of the fixed expenses. For now though, allocate them all.

Average out your semi-fixed expenses

For your semi-fixed expenses you’ll have to average out how much you’ve spent over the last 3-4 months. No need to get too crazy or precise as long as your in the ball park. You’ll be wrong anyway.

How to deal with periodic expenses

There will be many expenses that won’t occur this month but that you will need to save for like car registrations, birthday and Christmas gifts, and some insurance payments. To ensure you have enough money when the time comes you need to start saving that money now.

Most people just divide these expenses by 12 and save that amount each month. DON’T TAKE THIS APPROACH WHEN STARTING A BUDGET. You will end up short unless that expense is a full year away. Instead you need to take each expense, count how many months away it is, and divide the total payment amount by the number of months. For example, if I have a car registration payment of $100 due in four months, I will divide $100 by 4. That means I should budget $25 a month to save towards the registration. As soon as I pay the registration, I can then divide the next registration payment by 12 and save little by little for next year.

This approach may cause a little strain on your budget at first because you will need to be saving a larger amount each month for the expenses coming up in the short-term. However, once you make the payment, your monthly allocation will go down for that category freeing up extra cash that you can redirect wherever you want.

Step #5: Allocate your variable expenses.

Now that you’ve gotten a good chunk of your income out of the way, it’s time to deal with what’s left (hopefully it isn’t depressingly little). So far we haven’t worried about calculating income minus expenses. If you want to, you can do a quick calculation at this point so you know how much left over you’re dealing with. Or you can just speed through and budget your variable expenses and do a mass calculation at the end.

Try not to scrimp too much on your necessity categories like food, clothing, and transportation/gas. Most people underestimate these categories.

Personal money

I highly recommend allocating personal money for each spouse. Having your own money to spend however you want is crucial to making a budget work. Even if you can only afford to budget $10 or $20 dollars, it will help your budget feel more manageable.

Step #6: Calculate the difference between income and expenses.

Ahhh, the moment of truth. Subtract your total expenses from your total income. This is where a spreadsheet comes in handy. You might want to be sitting down when you do this. Don't hyperventilate.

Step #7: Adjust your categories until income = expenses

Now comes the hard part. You need to adjust your categories until your income equals your expenses. This is where you will need to make some trade-offs between one category and another. This step is usually where the most conflict occurs between couples because it exposes their conflicting values. If things get too heated, it’s probably better to take a break and continue later. Just remember that this is your first budget and you will refine things as you go. You don’t have to feel locked in to the decisions you make now.

What to do with a positive difference

If you’re in this situation, congratulations! Now you just have to allocate the remaining money. The whole point of a zero-based budget is that you need to ALLOCATE EVERYTHING. That way the remainder won’t just disappear through unconscious spending. The good news is you can allocate it any way you want. If you are going to allocate it as money to blow, that’s fine as long as you consciously do so. Some other suggestions for allocating this money include:

  • Pay down debt (THIS IS THE FIRST AND BEST CHOICE)
  • Save for retirement or your children’s college
  • Save for larger purchases like vehicles or furniture
  • Save for a vacation
What to do with a negative difference

I’m guessing that the vast majority of people will have allocated more expenses than they have income resulting in a negative difference. Don’t be discouraged! The first time we did this, reality hit us hard. We had to do a major evaluation of our priorities and really distinguish between our wants and needs.

For many families this process will expose that they have been spending more than they make and can’t support their current lifestyle on existing income. It can be extremely hard to realize that lifestyle changes are in order, but at least you now know the truth and can fix your problem instead of going into more debt.

Here are some suggestions for adjusting your budget:

  1. Identify all your non-necessities. Yes, cable is a non-necessity.
  2. Each spouse should rank the non-necessities in terms of importance to them
  3. Eliminate or reduce those that both spouses agree are a low priority

Hopefully by eliminating or lowering the easier “consensus” items you will now be at a zero balance. If not, you will have to negotiate which categories are most important to each of you. You may have to make a lifestyle change by either earning more income or lowering your cost of living. In some cases, moving to a less expensive place may be in order. Housing is usually the largest expense and can make the biggest difference to your expenses.

Step #8: Print out your final budget

I strongly recommend you print out your final budget and put it in a binder. This gives you a hard-copy record of your decisions. The problem with keeping only an electronic version is that you sometimes can’t be sure if it’s been changed from the original. Printing a copy allows you to put a stake in the ground for your decisions up to that point. It will also be useful when reconciling at the end of the month and planning next month’s budget.

Next steps

Congratulations! You’ve now completed your first zero-based budget. Now that you have a budget in place you will need to execute your plan and follow up at the end of the month to deal with what you actually spent. Over the next few weeks, I will be covering some ways to make tracking your spending and reconciling your budget much easier. The first month you use a budget, review it as often as you need to stay on track. Take a few moments each day to review your spending if necessary. I recommend reviewing your progress at least each week at first. Once you get your budget down, and with a few tips and tricks, you’ll be able to stay on track with a single monthly review.