Friday, May 29, 2009

Wendy's Chili Knock-off Recipe

This recipe came from the amazing class at the USU Extension on using/storing dried beans. The chili tasted identical to Wendy's! It was really good.

Serves 12:
2 pounds ground beef
1 (29 oz) can tomato sauce
1 (29 oz) can kidney beans (with liquid)
1 (29 oz) can pinto beans (with liquid)
1 cup diced onion (1 medium onion)
1/2 cup diced green chili pepper (2 chilies) (or 1 can diced green chilis)
3 medium tomatoes chopped
2-3 tsp cumin powder
3 TBS chili powder
1 1/2 tsp black pepper
2 tsp salt
2 cups water

Brown the ground beef in a skillet over medium heat. Drain off the fat. In a large pot, combine the beef plus all the remaining ingredients, and bring to a simmer over low heat. Cook for 2-3 hours or 4-5 hours using a crock pot on high.

Thursday, May 28, 2009

Thinning the Home Fruit Trees

As a relatively new fruit tree owner (last 2 years) I am trying to keep up with everything that should be done to the trees. This came in my email last week about thinning the fruit on your trees. I thought it was very useful and thought I would share, since it is time now to thin!! It is very hard for me to pluck those little fruits off when I have been so patient to get them.

Utah Pests’ Tree Fruit Advisory, 5-20-09 Page 3

University of Arizona Extension

Residential Growers: Thinning the Home Orchard

Fruit trees must like their job, because when left to their own devices they often produce more fruit than they can handle. Then, home gardeners are left wondering why their fruit aren’t as big or as sweet as those found in Utah’s farm stands and farmers markets. The solution to this problem is in proper pruning and thinning to keep a balance between fruit growth and tree health.

Why thin – The objective of thinning is to balance supply with demand (leaves per fruit) and in the case of apples and pears, to prevent or at least reduce biennial bearing. The goal is to have fewer fruit in favor of larger size, sweeter flavor, and a crop every year.

Supply and demand - For fruits to grow large and sweet, they require lots of energy in the form of carbohydrates. Maintaining a healthy root system and producing adequate new shoots and leaves also requires carbohydrate energy. This energy all comes from photosynthesis in the existing leaves. Too many developing fruits competing for the carbohydrates supply of a limited number of leaves result in lower fruit quality (smaller size, less sugar), weak shoot and root growth, and declining tree health. In the case of apples and pears, this energy drain in combination with plant hormones coming from the developing fruit, signal the plant to produce less flower buds for the following year.

Alternate cropping – Flower buds in temperate fruit trees begin their development the season before they open. For apple and pear, this starts 3 to 6 weeks after bloom. Peach flower buds begin to form 2 months after bloom. The presence of developing apple and pear fruitlets will prevent the short side-shoots known as spurs from initiating flower buds for the next year. If too many spurs set fruit in a given season, then there will be few or no blossoms the following year. This situation is known as alternate cropping or biennial bearing.

When to thin – Most fruit trees will partially thin themselves through natural fruit drop. However, this comes after a lot of energy is wasted on the extra fruit, and after the chance for improving return bloom has past. For best results, apples should be thinned when the largest fruits are between ½ and ¾ of an inch in diameter. Thinning late will help fruit size, but return bloom will be compromised. Peaches and other stone fruits should be thinned when fruits are ¾ to 1 inch in diameter. Stone fruits do not typically suffer from biennial bearing, but waiting too long wastes the plant’s energy and the opportunity to get the largest, sweetest fruit possible.

How to thin – When thinning, pick off the smallest fruits as well as any that are misshaped or damaged. Then adequately space the remaining fruits. Peaches, nectarines and other stone fruits should be spaced out 3 to 5 inches along a shoot. If the trees have not been properly pruned to reduce the amount of fruiting wood, additional thinning may be required to prevent a heavy crop from breaking limbs. To achieve the large sweet peaches that we all enjoy, a moderate-sized peach tree should only produce 100 to 150 fruits on the entire tree.

Apple blossoms come in clusters of five or six and, when pollination conditions are right, may try to produce three or more fruits on each cluster. For best results, apple clusters should be thinned to one fruit, and fruiting clusters spaced 6 to 8 inches apart.

Tuesday, May 26, 2009

Varieties of Beans

Beans are low in fat and loaded with nutrients, and we'd probably eat more of them if they weren't also loaded with flatulence-producing enzymes. One help to reduce gas is to change the water from time to time while you're soaking or cooking the beans. Pouring off the water helps gets rid of the indigestible complex sugars that create gas in your intestine. It also helps to cook the beans thoroughly, until they can be easily mashed with a fork. Most bean connoisseurs prefer dried beans, but canned beans are also available. These don't need to be cooked, but they tend to be saltier and less flavorful than reconstituted dried beans.

If you get overwhelmed at the grocery store (or cannery) when choosing beans for your food storage, here are a few favorites and how to use them:

Navy Beans

Navy beans are also known as pea beans, a small white bean used in navy bean soup, baked beans, casseroles and ethnic dishes. A large portion of the crop is used in canned beans and tomato sauce.

Pinto Beans

The pinto bean is a variety of the red kidney bean which was first cultivated by the Indians of South and Central America. The pinto bean is grown in Southeastern Utah and Southwestern Colorado. It is used in Mexican dishes, such as refried beans and chili.

Kidney Beans

The kidney bean is large, has a red color and is kidney shaped. They are frequently used for chili con carne, in salads, baked beans, dips, main dishes and casseroles.

Black Beans

Black beans are also known as turtle beans and are used in Oriental and Mediterranean cooking. A rich, thick soup is made with black beans in the Southern United States.
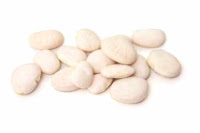
Lima Beans

There are two classes of lima beans—large seeded, or Ford-hook type, and small seeded, known as baby limas. In the southern part of the United States, the lima bean is called butter bean. Used for casseroles, main dishes, and vegetable side dishes.

Chick Peas

Chick peas are also known as garbanzos in Spanish-speaking countries. Chick peas have a nut-like flavor and keep their shape well when cooked. Chick peas are used on salads and in casseroles and soups. A favorite for using chick peas is making hummus.

Black Eyed Beans

Black eyed beans are also known as black-eye peas or cow peas, in different areas of the country. They are primarily used as a main dish vegetable and are traditionally served on New Year’s Day in the South as a token of good fortune during the new year. They are small, oval-shaped, and creamy white with a black spot on one side. Also good roasted with cajun seasonings.

Adzuki bean

The Japanese use these small red beans to make sweet red bean paste, but they're also good in rice dishes or salads. Adzuki beans are sweet and relatively easy to digest, so they won't make you as gassy as other beans. They also don't take as long to cook. Substitutes: black adzuki beans OR red kidney beans OR Tolosana beans.

Split Peas

Split peas are green and yellow in color. In grocery stores, split peas come cleaned in one-pound packages. Large quantities in bulk might also be available in specialty shops. Split peas are commonly used in soups.

Lentils

As the name implies, the lentil looks like a double lens. Lentils are dried on the plant and go through a number of processes to remove any extraneous plant materials. Therefore, they always need to be looked at carefully before cooking. Lentils are grown in the United States and come in various shades of brown. Almost all are grown at an altitude over 2,000 feet in Washington and Idaho. Good in soups and salads, or “baked lentil” dishes.

Selection

Dry beans are available in several forms, packaged in transparent packages, loose, or canned. The following are important factors in selection:

1. Bright, uniform color. Color will vary with the variety of bean, but loss of color usually indicates long storage time.

2. Uniform size. Uniformity of size will result in a more evenly cooked product since small beans cook faster than large beans.

3. Freedom from defects. Cracked seed coats, foreign material, and pinholes caused by insects are signs of a low quality product.

About one-third of all dry beans are officially inspected. Federal grades are generally based on shape, size, color, damage and foreign material. The packaged beans, which are on the grocery shelf, are normally the highest grades.

Thursday, May 21, 2009

The Versatile Bean

Tonight I went to a wonderful class on dried beans! I have been looking forward to this for a while. Wierd, I know. This information comes from the ladies at USU Extension in Provo. I wanted to share some of the information I learned on storing, preparing, and USING your beans! Can I just tell you how excited I am to use more beans? The recipes we tasted were delicious! I also realized that I have been storing my beans wrong! Time to fix that! Over the next few posts I will share all the recipes, tips, conversions, etc.

Nutritional Value: Bean are an excellent and inexpensive source of protein (average 22% protein in the seed), iron, thiamin, & riboflavin. They also contain zinc, dietary fiber and nutrients such as folate that tend to be low in most American diets. The Food Guide Pyramid encourages frequent consumption of beans- several cups a week! Dry beans contain all essential amino acids except one, methionine, which can be found in corn, rice, and meat. For a complete protein, pair beans with rice or corn!

Ways to use your beans: Consider all the ways to use and rotate your beans:
Appetizers (hummus, roasted & seasoned chick-peas)
Main Dishes (chili, soup, and casseroles)
Vegetable Sides (refried beans, bean patties, salads, and seasoned boiled beans)
Fillings (tacos, burritos, etc)
Breads (muffins, cakes, bread, brownies, cookies, pie)

Storing your beans: Beans should be stored in an airtight container in a cool, dry location. They do not need to be refrigerated and can keep 1-2 years if stored in this manner. Older beans will require longer soaking and cooking times than freshly harvested beans. A BYU study also found that when beans were packaged in #10 cans or mylar bags with an oxygen absorber, they have a shelf life of over 10 years. Since oxygen can lead to rancidity of bean oils and light can fade the bean color, storage of beans using #10 cans or mylar bags with an oxygen absorber is recommended. I have always put my beans in 5 gallon buckets with oxygen absorbers. I learned tonight, if you put them in buckets, you either need to put in a mylar bucket liner, or put the beans in mylar bags, then in the bucket.

Preparing to eat your beans:
  1. Sort through dry beans or peas and discard any that are discolored or shriveled.
  2. Rinse the beans and drain well.
  3. Soak the beans using one of the following methods (Note: Lentils and peas do not require soaking):
  • a. Overnight soak: Soak beans at room temperature or in the refrigerator 8 hours or overnight in a pan containing approximately 6-8 cups of water for each pound of beans. Drain and discard the water. Beans soaked using this method will keep their shape better, have a more uniform texture, and cook more quickly than those prepared by the quick soak method.
  • b. Quick soak: Bring 1 pound of beans or peas and 6-8 cups of water to a gentle boil. Boil 2 minutes. Remove pan from heat and let stand 1 hour. Drain, discarding the soaking water. Note: It is important that beans are not allowed to stand for more than 1-2 hours. The heat can activate bacterial spores and the warm temperatures during cooling can favor their growth causing the potential for food-borne illnesses.
4. Cook your re-hydrated beans using one of the following methods:
  • Stove-top: Place the soaked beans in a large pot, cover with hot water, add 1 TB of oil and simmer with the lid slightly ajar until the beans are tender. The oil will cut down on the amount of foam produced during cooking. Do not bring to a rolling boil or stir frequently as this will cause the bean skins to break. Add additional water if need. Most beans will tenderize within 2 hours; however, beans which have been stored for long periods will require a longer cooking time.
  • Pressure cooker: A pressure cooker will save time and energy when cooking beans. Never fill the cooker more than 1/3 full to allow for expansion of the beans. Add water and oil as above and cook at 15 pounds pressure for approximately 10-15 minutes.
  • Slow cooker: Since crock-pots can very in terms of wattage, follow your manufacturer's instructions for cooking beans. In general, you will cover your beans with 3 times their volume of unsalted water and bring to a boil. Boil 10 minutes, reduce heat, cover and allow to simmer 1 1/2 hours or until beans are tender. Discard water after cooking.
Bean cooking tips:
  • Do not add salt or acidic ingredients like vinegar, tomatoes or juice until after beans are fully cooked. These types of ingredients will slow the cooking process.
  • Cooking times vary with the types of beans used, but also vary with their age.
  • Beans are done when they can be easily mashed between two fingers or with a fork. Always test a few beans inc ase they have not cooked evenly.
Bean Conversions:
  • Two cups dry beans =one pound dry beans
  • One pound dry beans=six cups cooked beans, drained
  • One cup dry beans=three cups cooked beans, drained
  • One 15 oz can of beans=one and one-half cups cooked beans, drained
What about the gas??
Why do beans cause gas? To get technical, beans contain fiber and complex sugars which our bodies find difficult to process. The digestive enzymes in the gastrointestinal tract are not capable of breaking these sugars apart into simple sugars for absorption. In the lower intestine, the sugars are metabolized by bacteria and form carbon dioxide, hydrogen and methane gas. So what can you do about it?

It has been proven that if you gradually increase your consumption of beans, your system will adjust and be able to digest them more easily. While some information says that the longer beans are soaked, the more sugars are dissolved into the soak water, we cannot recommend that you allow your beans to sit in warm water for longer than 2 hours because of the risk of food-bnorne illnesses. However, we can recommend that you do a quick soak, allow to stand for up to 2 hours, then drain, rinse and immediately refrigerate. You can also take commercial nateral enzyme products such as Beano which help break down the complex sugars and make them easier to digest.

I am excited to share the yummy recipes we tried! You will be amazed! Stay tuned...

Wednesday, May 20, 2009

Fruit Tree Trauma

So I learned a hard, but valuable lesson this week. I went out as usual yesterday to check on the fruit on my 5 fruit trees that were planted last fall. Last Wednesday I sprayed all the trees with the appropriate spray to protect from pests. I was a bit nervous doing so, as I have never had fruit trees and wanted to do everything right. I carefully measured, mixed and sprayed the recommended amount on each tree. I even added spreader sticker so the pesticide would really stick to each leaf and fruit.

You can imagine my shock as I went out yesterday and all the leaves were falling off my trees! The leaves were turning brown and crunchy, curling lengthwise and into the letter "C". Panicked, I called the USU Extension Master Gardeners. The first question they asked me was if I had ever had any other type of chemical in my sprayer. Uh-Oh! Last year I used the same sprayer to spray dandelions with 2-4-d Amine, a broadleaf weed killer. Although I rinsed the canister very well, and even sprayed water through it, I guess there were chemicals still in the plastic. They said it doesn't take much of the weed killer to really damage the tree.

So, the lesson I learned: Never use the same sprayer for fruit trees and weed killer. I wish I would have learned that lesson the easy way. I am hoping that the trees will not completely die. USU said I won't know for about a month. If all the leaves fall, the fruit cannot mature. The leaves give the fruit the starch it needs to grow and develop. So, if they do pull through, I will buy a new sprayer that will only be used to spray my trees.

Wednesday, May 13, 2009

Storing Water

I decided to put this towards the top of the "food storage lessons" because water is the most critical portion of your food storage. We can live without food for much longer than we can live without water. In doing research about water storage, I went directly to USU extension services. I love them! They seem to have all the answers for any type of food storage question. Before you worry about shelves, getting your grains, sugars, etc, your first priority really needs to be water. The following is contributed by Carolyn Washburn, Utah State University Extension family and consumer sciences agent, Washington County, Utah:

Most often, the safety of our domestic water supply is of little concern. However, situations may occur when the water supply may be cut off or damaged. Consider this information for water storage and use in emergency situations.
• It is recommended that you store a gallon of water per person per day for drinking. One quart of water will sustain life, but you will likely not be as comfortable. You will also need additional water for washing. It is recommended that you store a minimum of a three-day supply of water, per person, but it would be best to have a two-week supply in your home for each family member.
• When drinkable water is properly disinfected and stored, it should have an indefinite shelf life, but to maintain the optimum drinking quality, water should be rotated every six months.
• Storage containers should be “food grade,” meaning they were meant to hold food or water. This includes containers made of glass, plastic, stainless steel or metals coated for food and water storage. They should have secure lids and spouts to allow dispensing without contamination.
• Clean all containers with soap, water and rinse well. Sanitize container and lid with one tablespoon bleach per gallon of water, shake well, empty container and allow to air dry. Juice and milk jugs may not be effective, as they may leak and may contain proteins and sugars from the previous foods. Two-liter pop containers are less likely to leak or hold residues. Do not store containers by materials that may leach into them. Store water containers off the ground and cement in a cool, dark place. Store a few containers in a freezer to provide ice if the electricity goes off.
• Most city-treated water is safe for storage without additives, but to ensure the storage of quality water, use a chlorine or heat treatment. To treat with chlorine, unscented, liquid bleach may be added to disinfect. Add eight drops, or 1/8 teaspoon bleach, to one gallon of water. To treat with heat, fill clean quart Mason jars and process in a boiling water canner for 20 minutes. This provides a way to have safe drinking water and also use jars that may be sitting empty.
• Purchased bottled water is a quick and convenient way of getting a water supply; however, it is not considered to be safer or purer than city-treated water.
• In an emergency, you may need additional water. If this becomes necessary, use water from pipes, ice cubes or your hot water heater. Only use water from swimming pools, toilet tanks or waterbeds as a last resort and then only for purposes other than drinking since chemicals may be present.
• In some emergency situations, you may need to treat or purify contaminated water, such as that from lakes, runoff, streams or ground water. To do this, boil water for five minutes, cool, then pour back and forth to improve taste. Chemical treatments may also be effective. A chlorine treatment of 1/4 teaspoon or 16 drops of unscented bleach may be used. Allow the water to sit for 30 minutes, then check for cloudiness. If it is cloudy, repeat the chemical treatment and let stand for 15 minutes. A slight chlorine odor should be present. If the water does not become clear, do not use it. Note the difference in treatment and purification amounts of bleach. For a treatment, use eight drops per gallon; for purification, use 16 drops.
• Water purification tablets are another option. Be sure to note their shelf life. Commercial water treatment units may also be used. Follow directions carefully and note the additional treatments that may be needed. Be aware that there is no effective way to decontaminate water that contains radioactive chemicals or fallout.
Water storage is important to your survival in the event of an emergency. Being prepared is critical. Additional preparedness information is available through your local USU Extension county office.

Tuesday, May 12, 2009

Dough Enhancers and Vital Wheat Gluten

I love making bread! It is so nice to be able to pull out a bread packet, mix it up and wa-lah! Bread in about 1 1/2 hours. There are many great bread recipes out there. My favorite recipe is on another post. Many of them call for "dough enhancers" (also called "dough conditioners") and "vital wheat gluten". So, what exactly are these? If you are new to making bread, the understanding of these is important!

Dough Enhancer or Dough Conditioner
This product improves the rise, taste, texture, color, crumb and shelf-life of whole grain breads. It contributes softness and lightness to breads. Although you can purchase ready made "dough enhancer", you can get the exact same results (I actually prefer the homemade ones!), at a fraction of the cost.

How to make your own dough enhancer:

It’s best to use all three of these enhancers when making whole wheat bread.

Gluten: Use 1/2 Tbsp. - 1 Tbsp. per cup of flour (this means before you measure a cup of flour, place the measured gluten in the bottom of your cup and then measure the flour as usual). Or, you can just add the gluten with all of the other dry ingredients. Gluten holds the air bubbles. It is a non-animal form of protein.

White Vinegar: Use the same amount of vinegar as the amount of yeast called for in the recipe (i.e., 1 tsp. yeast = 1 tsp. vinegar). Acid strengthens the bubbles. You can substitute lemon juice for the vinegar. I have used both, but generally use vinegar as it is so much cheaper.

Potato Flakes: Use 1/8 - 1/4 cup per loaf of bread you are making. Experiment to see what works best in your recipe. Do not substitute potato pearls for the flakes! They don’t dissolve as easily and add artificial flavoring to your breads. The starch in the potatoes adds an extra casing around the bubbles. The bran in the wheat is coarse and can pop or rupture the bubbles, so this helps maintain the fluffy texture of the bread.

Vital Wheat Gluten

Vital wheat gluten only does one thing. It helps improve the rise and texture of the bread. Vital wheat gluten occurs naturally in all wheat and wheat derived white flours. Some white flours have more or less than others. In a dry form, it is used to give the yeast a boost because it contains a high amount of gluten forming proteins. Use it in your heavier breads that rise slowly, such as whole grains, rye, or ones loaded with sugar, dried fruit and nuts. Generally, if you are using white bread flour you don’t need to add any gluten. However, all-purpose or whole-grain flours need vital wheat gluten.

As a general rule, use 1 tsp. per cup of all-purpose or 1 1/2 - 3 tsp. for every cup of whole grain or rye flours. Or 1 Tbsp. for each loaf of bread. Some recipes will differ in the amount of gluten to use.

Make sure that you store a year supply of vinegar, potato flakes and gluten. I buy vital wheat gluten at the health food store in the bulk section. It is quite inexpensive if purchased this way. I then put it in #10 cans.

Monday, May 11, 2009

Tomato Tips

My mom has the most BEAUTIFUL tomatoes that I have ever seen. The plants themselves are thick, lush green, and the tomatoes are the size of grapefruits. She has an amazing yield. Each year as I compare my tomatoes to her, I simply can't believe that I even planted the same varieties! I asked her the secret. She said that her secret is in the fertilizer. After trying many different fertilizers, she found one makes her tomatoes the envy of the neighborhood. The only kind of fertilizer she uses now is "Fertilome Blooming & Rooting Soluble Plant Food (9-59-8)". She mixes 2 TBS with 1 gallon of water and uses this mixture for all of her vegetables and flowers throughout the growing season. She said to make sure the tomato plant is established (in ground for 1-2 weeks) before applying the fertilizer. Then, fertilize every 10-14 days. If you could only see her tomatoes!! I am on my way to go buy some of the fertilizer in hopes I have the same success!

Here are some more tips from USU extension services when it comes to tomatoes:
  • Tomatoes are categorized by maturity class (early, mid-season or late), fruit shape or size (cherry, pear, plum or large), plant size (determinate, semi-determinate or indeterminate), fruit color (red, pink, yellow, orange) and use (fresh, process or dual use). When selecting varieties, consider the growing environment, primary use and available growing space. Most garden centers and nurseries carry varieties that have been proven to grow well and produce high quality, flavorful fruits for local conditions.
Note: For square foot gardening, you will want to choose indeterminate plants that you can trellis.
  • Tomatoes can be grown from seeds or transplants. Transplants should have five to seven mature leaves and a well-developed root system. Transplants mature about four weeks before seeded tomatoes and are recommended for most growing areas in Utah. Tomatoes prefer a sunny location and fertile, well-drained soils. Incorporate plenty of organic matter and a complete fertilizer into the area before planting.
  • Plant tomato seeds directly in the garden 10-14 days before the last frost date. Plant four to five seeds ½ inch deep at the recommended plant spacing and later thin the weaker plants. Most gardeners transplant tomatoes through black plastic for earlier maturity. Use row covers or hot caps to protect the plants when planting before the frost-free period. Space tomatoes 2 feet apart in the row with rows 2-3 feet apart.
  • Plant three to four tomato plants per person for fresh use and an additional five to 10 plants for juicing, canning or freezing. Expect 100 lbs. of fruit per 100 feet of row.
  • Irrigation should be deep and infrequent. Apply 1-2 inches of water per week. Use drip irrigation if possible. Place mulch around the plant to conserve soil moisture and reduce weed growth. Do not apply organic mulches until soils have warmed to 75 F. Irrigate so that moisture goes deep into the soil. Irregular watering (over or under) can cause blossom-end rot, a dark leathery spot on the bottom of the fruit.
  • Use wooden stakes or wire cages to support semi- or indeterminate plants. Staking helps reduce sunburned fruits and keeps ripening fruits off the ground. Drive stakes 18 inches into the soil, 3-4 inches from the stem. Indeterminate varieties require more support and vine pruning to keep plant size manageable. Continue to tie up plants as they grow.
  • Control insects and diseases throughout the year. Common problems are tomato horn worm, aphids, fusarium and verticilium wilt. Always identify the problem before using a pesticide. Your local county Extension office can help identify the problem and offer solutions.
  • Tomatoes require 25-35 days to mature from flowering, depending on the temperature and variety. For best flavor and quality, pick fruits when they are fully colored but firm, and pick as they ripen. At the end of the season, harvest all fruits that are mature green or slightly colored. Store at 55 F and use as they ripen. Ripe tomatoes will store for one to two weeks if held at 50-55 F. Fruits are subject to chilling injury, so do not store them for more than a few days in the refrigerator.
The following are answers to tomato questions:

Q: What causes the flowers to drop off my tomato plants?
A: During unfavorable weather (night temperatures lower than 55 F or day temperatures above 95 F), tomatoes do not set and flowers abort. The problem usually disappears as the weather improves.

Q: What can I do to prevent my tomatoes from cracking?
A: Some varieties are more prone to cracking than others. Many newer hybrid varieties are quite resistant. Severe root or vine pruning increases cracking. Keep soil moisture uniform as tomatoes develop and plant resistant varieties to minimize the problem.

Q:
On some of my tomato plants, the leaves are turning yellow and the plants are no longer growing. Also, the fruits are ripening prematurely, and are leathery and bitter. What is wrong?
A: Tomatoes with these symptoms are infected with the curly top virus, a disease transmitted by the beet leaf hopper. Once infected, there is very little you can do. Since the severity of curly top varies from year to year, planting a few more plants than required will compensate for potential losses. Plant varieties resistant to curly top include Roza, Columbia, Rowpac and Saladmaster.

Q:
Why are the new leaves on my tomato pointed, cupped, twisted and irregular in shape?
A: Your tomatoes may have been injured by 2,4-D or a similar growth regulator weed killer. Never use the same sprayer in your vegetable garden that you use for weed control in your lawn. Use caution when applying lawn care chemicals near vegetables or fruits. If applying grass clippings to the garden, make sure the herbicides used are safe for food plants. Consult with your lawn care professional to ensure the chemicals applied to your lawn will not affect your edible garden plants.

Friday, May 8, 2009

Garden Delight

I asked my husband the other day if it was weird that I get so excited by my garden! Each day when I go out and look at the little seedlings coming up, it really makes my day! It is very fulfilling to me. I get so excited to spend time getting it planted, watered, etc. Hopefully my enthusiam will last the whole growing season. I haven't got my irrigation system figured out yet. Today I will go and talk to the folks at the irrigation store to get some help. I have always used a drip system in my garden, but now since I am doing square foot gardens, I am not sure that is the best way.

It is time to get planting! It is not too late to plant lettuce, peas, radishes or other cool weather crops. And now it is time to get everything else planted! I always jump the gun a bit and plant earlier than is recommended. This year I got burned. We had a hard freeze several days after I planted. I covered the garden with black plastic, but I still lost 3 tomato plants and 3 cucumber plants. However, even having to replace a couple of plants, everything is coming up beautifully. So far the only things that have not come up are my canteloupes, and several beans which I will reseed tomorrow.

For square foot gardening, here are the totals per square for different seeds:
Plant (#per square)
Asparagus (1)
Basil (4)
Beans, Pole (8)
Beans, Bush (9)
Beets (9)
Broccoli (1)
Cauliflower (1)
Carrots (16)
Cilantro (4)
Corn (4)
Cukes (2)
Dill (4)
Eggplant (1)
Lettuce (4)
Okra (1)
Onions (9-16)
Oregano (1)
Parsley (1)
Peas (8)
Peppers (1)
Potatoes (4)
Radishes (16)
Rosemary (1)
Spinach (9)
Swiss Chard (4)
Tomatoes Vine (1)

Plant (#of squares)
Cantaloupe (2)
Pumpkins (2)
Summer squash (9)
Bush Tomatoes (9)
Watermelon (2)
Zucchini (9)

Some links on square foot gardening:
www.mysquarefootgarden.net
www.squarefootgarden.com

Happy Planting! Even if you don't want to plant a huge garden, plant some pots! It is amazing how much fun growing can be!


Beans, eggplant, beets, carrots and lettuce. Some are ready to snip (I planted 2 in each hole-and they all germinated!)The small trellis we made for a few tomato plantsPlanting in pots works great. Chives, rosemary, strawberries, rhubarb & tomatoes Not shown: around the trunks of my trees I plant basil, oregano and thyme.While planting, I planted a bunch of flower pots as well. What a difference they make in my yard!

Cucumbers (top row)
Spinach (bottom row)


Below: My "Salsa" garden: peppers, jalepenos, anaheims, and some garlic and lettuce too!


Monday, May 4, 2009

Spring Salsa

This time of year as I am putting my little tomato plants into the ground, I start craving Salsa! Although my absolute favorite Salsa has fresh tomatoes, jalepanos, onions and cilantro from the garden, this quick salsa is right up there. If you have a food processor, this is ready in a snap.

Put in food processor and pulse until pieces are small:
1 large white onion
1 anaheim pepper, seeds taken out
1 /2 jalepeno, seeds taken out
Add:
1 large can petite diced tomatoes
1/2-1 bunch cilantro (according to taste)
1 tsp salt (to taste)
Juice of 2 limes
Pinch of sugar
Pulse until mixed thoroughly.

Enjoy!