Friday, March 26, 2010

Artisan Bread

Artisan Breads are my favorite types of bread.  There is nothing better than the hard, crisp crust, with the moist, melt in your mouth inside.  Yum!  Recently, my friend brought over a loaf of this succulent stuff.  My family quickly devoured it.  I immediately called her asking for the recipe.  She said she got it from the book "Artisan Bread in Five Minutes a Day".  I quickly went and got the book.  Needless to say, this is my new favorite book!!  The bread is AMAZING, super easy, and really does only take minutes a day to make.  Seriously!  The bread tastes as good as the artisan loaves from the bakery, and costs about .40 cents per loaf (even less if you use fresh ground whole wheat flour).   The premise behind the bread is that you mix up a batch of dough (each batch makes four 1-pound loaves), let it sit on the counter for 2 hours, and then refrigerate overnight.  Then you can just cut off the amount of dough you want to bake, and put the rest of the dough back in the fridge for up to 2 weeks. As the dough sits in the fridge, it gets this amazing taste..... WOW!  I highly recommend getting this book!!!  It is well worth the $19 on Amazon.com!!!  Here is the basic recipe.  Try it out!  You can do so much with this dough! I have been making double batches of dough, keeping in the fridge, and making fresh, delicious Artisan bread almost daily.  YUM!!

The Master Recipe: Boule (Artisan Free-Form Loaf)
Makes four 1-pound loaves.  The recipe is easily doubled or halved.
3 cups lukewarm water
1 1/2 TBS granulated yeast
1 1/2 TBS kosher or other coarse salt
6 1/2 cups unsifted, unbleached, all purpose white flour
Cornmeal for pizza peel

Directions: 
  1. Put warm water in a large bowl.  Add yeast and salt.  
  2. Add flour all at once.  Mix with wooden spoon.  You can also mix this in your KitchenAid with the dough hook.  
  3. Do not knead. Just make sure all of the flour is incorporated and that there are no dry spots.
  4. Cover with a lid (not airtight) and let rise for 2 hours on your counter.
  5. Put in refrigerator for at least 3 hours, or overnight.
To Bake:
  1. Cut off the amount of dough you wish to use.  Use a generously floured pizza peel (I use a flexible cutting board), to put the formed ball on.  Do not incorporate the flour into the dough.  Just use it so the dough won't stick to your hands.  
  2. Put the blob of round dough on the floured or cornmeal covered peel.  Let rest for 40 minutes.
  3. 20 minutes before baking, preheat the oven to 450 degrees, with a baking stone placed on the middle rack.  Place an empty pan for holding water on any other shelf that won't interfere with the rising bread.
  4. Dust the top of the dough with flour, and slash the top with a tic-tac-toe shape, or with an "x".
  5. Slide the blob onto the heated stone.  Immediately pour a cup of water on the second pan and quickly shut the oven door.
  6. Bake for about 30 minutes until the crust is nicely browned and firm to the touch.
  7. Cool completely on wire rack.
  8. Don't store in plastic.  This will cause moisture to soften the crust.  
Happy Baking!
 Ingredients in a big bowl, ready for mixing.  Use a wooden spoon.


Dough is mixed, and covered.  Let sit on counter for 2  hours, then put in fridge.


Dough formed into a ball, resting on cornmeal or flour (or both) pizza peel or cutting board.  You may want to put a piece of parchment under the dough so it slides easy.  Cornmeal works wonderful.  Let rest for about 40 minutes.


20 minutes before baking time, preheat oven to 450 degrees.  Put pizza stone in oven to preheat, as well as a pan.  When oven is preheated, slide blobs of dough onto the stone.  Immediately put water in the pan, and quickly close the door.  Bake.


The finished product.  Yummy!!!!


    Tuesday, March 23, 2010

    Financial Peace University Week 6: Buyer Beware

    This week – Buyer Beware!

    This week we talked about common traps to avoid when buying things.   Some of the important points from the lesson:
    1. Learn the marketing method companies use to market products and services to you. You can be in control!
    2. Wait 24 hours before making a major purchase larger than $200 (or whatever amount you and your spouse decide on).
    3. Always talk to your spouse before making a major purchase.
    Know the marketing techniques businesses are using to get you to SPEND:

    Almost all businesses use highly trained individuals to get you to buy their product.  Most companies use the same tactics and marketing ploys.  Why? Because they work!  If we know what the tactic is, we can spot it, and hopefully not fall into the trap.

    For example, one tactic a lot of companies are using is the 0% financing offer.  They lure you into buying a product (dryer, a car, a big screen TV, etc), with the 0% offer.   What they don’t tell you (except for in the fine print) is that if you don’t pay the balance of that loan in full by the time the initial term is over, your finance rates will shoot up considerably (often to 30% or more) , and you’ll often be liable for the finance charges for the 0% term as well.  Or, if that isn't bad enough, the cost of the 0% financing is already added in to the product you are buying.

    Wait 24 hours before making a major purchase:
    This one step is crucial.  This often eliminates the impulse purchases we all make.  If after the 24 hours you really need it, and you have the cash to pay for it, great.  Often times when we wait for the 24 hours, we realize that we really didn't need or want the item.  It was just a spur of the moment impulse.
    Always talk to your spouse before making a major purchase:
    Only after discussing and counseling with your spouse should you make a major purchase.  This keeps the lines of communication open, and the trust there.  Often times your spouse can help us decide if we really should get the item.

    Look at the opportunity cost of the item:
    This means, look at what you are giving up to buy that item.  Is it worth it??

    Understand about the item before you buy anything:
    Dave Ramsey talks about how we should never purchase anything that we don't understand.  This could be for insurance, mutual funds, or even a new camera. 

    Next week
    Next week is a lesson entitled “Clause and Effect” which deals with common traps to avoid when buying insurance of all kinds. See you next week!

    Sunday, March 21, 2010

    Blender Wheat Pancakes with Buttermilk Syrup

    This recipe is a keeper.  It is a great way to use your wheat without the use of a wheat grinder.  It also uses powdered milk, and powdered eggs (although fresh works great too).

    Blender Wheat Pancakes
    1 cup Milk (or 3 TBS powdered milk and 1 cup water)
    1 cup Wheat Kernels, whole and uncooked
    2 Eggs (or 2 TBS powdered eggs & 1/4 cup water)
    2 tsp Baking Powder
    1 1/2 tsp Salt
    2 TBS Oil
    2 TBS Honey or Sugar
    Put milk and wheat kernels in blender.  Blend on highest speed for 4-5 minutes or until batter is smooth.  Add eggs, oil, baking powder, salt and honey or sugar to batter.  Blend on low.  Pour out batter onto preheated griddle (sprayed with Pam).  Cook; flipping pancakes when bubbles pop and create holes. Serve with any syrup, although we love the Buttermilk Syrup.

    For Waffles:  Add an additional 1 TBS wheat.  Increase oil to 4 TBS.

    Buttermilk Syrup
    • 1 cube Butter or Margarine (I like butter better)
    • 1 cup Sugar
    • 1 TBS Corn Syrup
    • 1/2 cup Buttermilk (can also use 1/2 cup milk with 1 1/2 tsp lemon juice added; or powdered)
    Melt and boil for 2 minutes.  Remove from heat.  Add:
    • 1 tsp Vanilla
    • 1/2 tsp Baking Soda
    Combine and pour over pancakes.  YUMMY!!!

    Wednesday, March 17, 2010

    2010 Square Foot Garden Plan

    Here is my 2010 garden plan.  Last year I was able to harvest enough onions to last the winter,  can some beans, and dehydrate lots of peppers.  We simply couldn't keep up with the amount that was ripening.  There is absolutely nothing better than fresh vegetables all summer.  If I would have realized how much I would love square foot gardening, I would have started it 15 years ago!
    Garden Plan 2010

    Monday, March 15, 2010

    Dehydrating Celery


    I found a great deal on celery last week.  It was only .50 cents per head!  So, I thought I would dehydrate it for my food storage.  This would be great in soups, casseroles, chicken salad, or anything else you use fresh celery in.  Remember, when constituted, the celery will not have the same crispness as fresh. 

    Steps:
    1. Keeping the celery in a head, wash the stalks. 
    2. Cut 1/2 inch off the leaf end.
    3. Using a meat slicer, or mandolin, cut whole celery head into about 1/4 inch slices. Use leaves as well as stalks.  Keeping it together in a head is easier.  If you do each stalk individually, it would take forever. Slices should be the same thickness to ensure even drying.
    4. When you have about 3 inches left on the head, rewash, getting all the dirt out of each stalk.
    5. Continue slicing until the bottom of the head is reached. 
    6. Blanch celery in boiling water for 1 minute.  This step is optional, but will result in a brighter color and better texture end product.
    7. Rinse under cold water, to stop cooking process.
    8. Spread out on dehydrator trays in a single layer.
    9. Dehydrate for 10-12 hours or until pieces are crisp. If your dehydrator has a temperature control, it should be set for 120-125 degrees.
    10. Best stored in a vacuum packed bag with an oxygen absorber.
    When I looked at how much it cost to buy dehydrated celery, it made me very glad to do my own.


    Celery is washed, and sliced.


    Blanch for 1 minute in boiling water.


    Spread out on tray, in a single layer.


    Finished product.


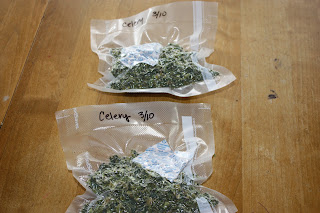
    Packaged in vacuum bag with oxygen absorber.  Ready to be stored!

    Friday, March 12, 2010

    Cream Cheese Potato Soup

    This soup is FABULOUS.  It is super fast, super easy, and a great way to use dehydrated potatoes (or frozen).

    Cream Cheese Potato Soup:
    • 6 cups water
    • 7 teaspoons chicken bouillon granules, or 2-3 TB chicken Base
    • 2 packages (8 oz each) cream cheese, cubed (can use reduced fat)
    • 1 package (30 oz) frozen cubed or shredded hash brown potatoes, thawed OR 2 cups dehydrated hashbrowns
    • 1 1/2-2 cups cubed fully cooked ham
    • 1/2 cup chopped onion (or 1/3 cup dehydrated onion)
    • 1 tsp garlic powder
    • 1 tsp dill weed
    In a large pot, combine the water and bouillon.  Add cream cheese.  Cook and stir until cheese is melted.  Stir in remaining ingredients.  Bring to a boil.  Reduce heat; and simmer, uncovered, for about 20 minutes, or until vegetables are tender.  This is one of my family's absolute favorite.

    Wednesday, March 10, 2010

    Square Foot Gardening: Companion Planting

    For those of us who are getting really excited to plant our gardens, I found a great tool to use.  One of my favorite websites, www.mysquarefootgarden.net, just posted a great guide on companion planting.  As I am in the process of designing my 2010 garden plan, I am finding it very useful.  Click here to get the guide!  Happy garden designing.....

    Even if you don't use a square foot garden, this info would be great in a traditional garden as well!

    Monday, March 8, 2010

    Dehydrating Potatoes

    This is a great time of year to pull out the dehydrator!  In a couple of months, the time will be filled with canning fruits and vegetables.  So, why not build your food storage with dehydrated food NOW, while some things are going on sale really cheap.  For instance, several weeks ago, a 10 pound bag of potatoes went on sale for .99 cents.  This week, frozen shredded hashbrowns went on sale for $1.25 for a 28 oz bag.  Potatoes are excellent for dehydrating.

    To dehydrate fresh potatoes:
    1. Wash potatoes. 
    2. Boil potatoes until done.  You don't want them so done that they fall apart, but they do need to be cooked all the way through.  If not, they will turn black when they are dehydrated.  Gross.
    3. Put cooked potatoes in fridge overnight, so they are very cold, and solid.
    4. If you want, you can peel them.  I don't.
    5. Using either a meat slicer or a cheese grater, either slice the potatoes or grate them.  The slices need to be pretty uniform so they will dry evenly.
    6. Put slices or shreds on trays, in a single layer.
    7. Dehydrate slices for 10-12 hours or until they are crispy and translucent. If your dehydrator has a temperature control, it should be between 120-125 degrees.  This will prevent case hardening (where the outside is dry, but there is still moisture on the inside).
    8. Dehydrated shreds for 7-9 hours or until they are crispy.
    9. Best to store in a vacuum packed bag with an oxygen absorber.  I like to leave them in a open ziplok bag, then in a vacuum bag.  They are pretty sharp, and I don't want them to poke through the vacuum bag.
    10. These are EXCELLENT for AuGratin Potatoes, casseroles, etc.
    To dehydrate frozen shredded potatoes (hashbrowns):
    1. Choose potatoes that do not have added fat to them.  
    2. Put frozen shreds on a single layer on dehydrator trays.
    3. Dehydrate for 7-9 hours or until crispy. If your dehydrator has a temp. control, set it between 120-125 degrees.
    4. Best to store in a vacuum packed bag with an oxygen absorber.  I like to leave them in a open ziplok bag, then in a vacuum bag.  They are pretty sharp, and I don't want them to poke through the vacuum bag.
    5. These are wonderful rehydrated and fried, or in soups, casseroles, "funeral potatoes" etc.


    Frozen potatoes, on sale, for a great price.  I love to dehydrate this type because all the work is done for you! It sure makes it easy.


    Spread out in a single layer.  I like to rotate my trays about 1/2 way through.


    All the trays are full and ready to go. 
     
    Great for food storage!!

    Saturday, March 6, 2010

    Financial Peace University Week 4: Dumping Debt

    This was one of the most intense weeks ever in class!  The DVD was very inspiring and motivating.  At the end of the class, each of us were ready to go and conquer any and all debt!
    This week's lesson: Dumping Debt!

    Last week our class added up the total amount of debt (not including the home mortgage) that we had.  I was FLOORED.  The total came in at just under $460,000!!  Wow.  This lesson really hits home for a lot of people.

    Imagine being DEBT FREE.  Dave teaches about how to do this, which is Baby Step #2 – Paying off all debt using the debt snowball.

    Key points from this lesson:
    1. Being Gazelle Intense is the only way to conquer debt.  A lax attitude will not get you very far!!  As Dave Ramsey says, "YOU HAVE GOT TO KICK IT BABY!"
    2. Debt has only become accepted as normal in America in our generation.  Our great grandparents abhorred debt.  Our grandparents didn't like debt.  Our parents used debt for the big stuff (house and car), and we use debt for EVERYTHING.
    3. Make a commitment to never use credit cards again. This is the first and most important step to dumping debt. In class, we had people come up and cut up their cards.  It was very emotional, and liberating.
    4. Do not become slave to the FICO score. It seems that we will do anything to have a good credit score.  It really is an "I love debt score".  Some people claim that credit is the only way to: rent a car, get a mortgage, etc.  Dave says that there are other ways to accomplish these things.  A debit card has the same protection as a credit card.  And yes, you CAN get a mortgage without a FICO score.  Debt should never be the first way to accomplish anything.
    5. The rich rule over the poor, and the borrower is servant to the lender. Proverbs 22:7
    Baby Step 2 – The Debt Snowball I previously posted on this topic in detail, so click here to get the info.  Here is the short version of Baby Step #2, The Debt Snowball.
    Here’s how the debt snowball works:
    Step 1 – Make a list of all your debts, ranked in order from the highest balance to the smallest balance.
    Step 2 – Beginning with the card with the smallest balance, pay as much as you can on that card while paying the minimums on the other cards.
    Step 3 – Once the card with the smallest balance is paid off, take the amount you were paying towards that card and apply to the card with the next lowest balance.
    Step 4 – Keep on paying them off until ALL the debts are paid off.

    Steps to getting out of debt:

    1. Quit borrowing more money!! Commit right now to NEVER take out any more debt.
    2. Cut up your credit cards. This was hard for me!  Although I haven't used credit cards for several years, I have kept them for an emergency.  No more!
    3. Get an extra job. Even if it is temporary, the extra income can really accelerate the debt snowball.
    4. Sell stuff.  Plan a yard sale or put stuff on ebay.  Use the cash to pay toward your debt.
    5. Get the debt snowball rolling! Pay off the lowest debt first, then add the amount you were paying for that debt and roll it over to the next debt.
    6. The average person who applies these principles is DEBT FREE except for the house in 18-24 months!!!
    Here is the Dave Ramsey Debt Snowball Form:


    Debt Snowball Form

    Thursday, March 4, 2010

    Negotiating the Phone Bill

    A couple of weeks ago in our Financial Peace University class, Dave Ramsey talked about how he negotiates many things with finances.  I decided to give it a try.  The very next day I called Vonage, our phone service provider, and asked them if I was getting the best price.  I told them I might switch to a different phone service that was cheaper.  I had been paying $24.99 per month plus taxes.  At the end of the call, I now have a BETTER plan with Vonage than I had previously, and my cost is $12.99 per month plus tax.  Fabulous!!  I guess negotiating really does work....

    Tuesday, March 2, 2010

    Why Dehydrate Food?

    Lately I have got into the food dehydration craze!  As I have been reading everything I can about dehydrating food (and dehydrating everything I can get my hands on), this is what I have found:
    • dehydrated food takes up much less space than canning or freezing
    • dehydrating food can compliment your food storage, adding lots more flavors, textures, and ingredients
    • it is really easy to do
    • it is really inexpensive to do
    • dehydrated food can last a long, long time (as long as it is stored properly)  
    University of Illinois at Urbana-Champaign
    College of Agriculture
    Cooperative Extension Service
    Circular 1227
    Drying is the oldest method of preserving food. The early American settlers dried foods such as corn, apple slices, currants, grapes, and meat. Compared with other methods, drying is quite simple. In fact, you may already have most of the equipment on hand. Dried foods keep well because the moisture content is so low that spoilage organisms cannot grow.

    Drying will never replace canning and freezing because these methods do a better job of retaining the taste, appearance, and nutritive value of fresh food. But drying is an excellent way to preserve foods that can add variety to meals and provide delicious, nutritious snacks. One of the biggest advantages of dried foods is that they take much less storage space than canned or frozen foods.

    Recommended methods for canning and freezing have been determined by research and widespread experience. Home drying, however, does not have firmly established procedures. Food can be dried several ways, for example, by the sun if the air is hot and dry enough, or in an oven or dryer if the climate is humid. With the renewed interest in gardening and natural foods and because of the high cost of commercially dried products, drying foods at home is becoming popular again. Drying is not difficult, but it does take time and a lot of attention. Although there are different drying methods, the guidelines remain the same.

    Although solar drying is a popular and very inexpensive method, Illinois does not have a suitable climate for it. Dependable solar dehydration of foods requires 3 to 5 consecutive days when the temperature is 95 degrees F. and the humidity is very low. The average relative humidity in central Illinois on days with 95 degrees F. temperatures is usually 86 percent. Solar drying is thus not feasible.

    Drying food in the oven of a kitchen range, on the other hand, can be very expensive. In an electric oven, drying food has been found to be nine to twelve times as costly as canning it. Food dehydrators are less expensive to operate but are only useful for a few months of the year. A convection oven can be the most economical investment if the proper model is chosen. A convection oven that has a controllable temperature starting at 120 degrees F. and a continuous operation feature rather than a timer-controlled one will function quite well as a dehydrator during the gardening months. For the rest of the year it can be used as a tabletop oven.

    GUIDELINES

    Speed

    For a good-quality product, vegetables and fruits must be prepared for drying as soon as possible after harvesting. They should be blanched, cooled, and laid out to dry without delay. Foods should be dried rapidly, but not so fast that the outside becomes hard before the moisture inside has a chance to evaporate.
    Drying must not be interrupted. Once you start drying the food, don't let it cool down in order to start drying again later. Mold and other spoilage organisms can grow on partly dried food.

    Temperature

    During the first part of the drying process, the air temperature can be relatively high, that is, 150 degrees to 160 degrees F. (65 degrees to 70 degrees C.), so that moisture can evaporate quickly from the food. Because food loses heat during rapid evaporation, the air temperature can be high without increasing the temperature of the food. But as soon as surface moisture is lost (the outside begins to feel dry) and the rate of evaporation slows down, the food warms up. The air temperature must then be reduced to about 140 degrees F. (60 degrees C.).

    Toward the end of the drying process the food can scorch easily, so you must watch it carefully. Each fruit and vegetable has a critical temperature above which a scorched taste develops. The temperature should be high enough to evaporate moisture from the food, but not high enough to cook the food. Carefully follow directions for regulating temperatures.

    Humidity and Ventilation

    Rapid dehydration is desirable. The higher the temperature and the lower the humidity, the more rapid the rate of dehydration will be. Humid air slows down evaporation. Keep this in mind if you plan to dry food on hot, muggy summer days. If drying takes place too fast, however, "case hardening" will occur. This means that the cells on the outside of the pieces of food give up moisture faster than the cells on the inside. The surface becomes hard, preventing the escape of moisture from the inside.

    Moisture in the food escapes by evaporating into the air. Trapped air soon takes on as much moisture as it can hold, and then drying can no longer take place. For this reason, be sure the ventilation around your oven or in your food dryer is adequate.

    Uniform Drying

    Drying the food evenly takes a little extra effort and attention. Stirring the pieces of food frequently and shifting the racks in the oven or dryer are essential because heat is not the same in all parts of the dryer. For the best results, spread thin layers of uniformly-sized pieces of food on the drying racks.

    NUTRITIVE VALUE

    Dried fruits are a good source of energy because they contain concentrated fruit sugars. Fruits also contain a rather large amount of vitamins and minerals. The drying process, however, destroys some of the vitamins, especially A and C. Exposing fruit to sulfur before drying helps retain vitamins A and C. Sulfur destroys thiamine, one of the B vitamins, but fruit is not an important source of thiamine anyway. Many dried fruits are rich in riboflavin and iron.

    Vegetables are a good source of minerals and the B vitamins thiamine, riboflavin, and niacin. Both fruits and vegetables provide useful amounts of the fiber (bulk) we need. Save the water used for soaking or cooking dried foods because this nutrient-rich water can be used in recipes to make soups, sauces, and gravy.

    TYPES OF FOOD TO DRY

    Many kinds of fresh fruits, vegetables, herbs, meat, and fish can be dried. If you have never tried drying food before, though, it's a good idea to experiment first by drying a small quantity in the oven. This way you can see if you like the taste and texture of dried food. At the same time, you can become familiar with the drying process.

    Fruits are easier to dry than vegetables because moisture evaporates wore easily, and not as much moisture must be removed for the product to keep. Ripe apples, berries, cherries, peaches, apricots, and pears are practical to dry.

    Vegetables that are also practical to dry include peas, corn, peppers, zucchini, okra, onions, and green beans. Produce from the supermarket is usually more expensive and not as fresh as it should be for drying. It is a waste of time and energy to dry vegetables such as carrots that can be kept for several months in a cool, dry basement or cellar.

    Fresh herbs of all types are suitable for drying. The parts of the plant to dry vary, but leaves, seeds, or blossoms usually give the best results.

    Lean meats such as beef, lamb, and venison can be dried for jerky. Fish also is excellent when dried. Certain foods are not suitable for drying because of their high moisture content. Lettuce, melons, and cucumbers are a few foods that do not dry well.

    SUCCESSFUL DRYING

    Don't be surprised to find a variety of suggestions for drying methods, temperatures, and lengths of time. The drying process is simply not as precise as canning and freezing because it involves so many different factors. You may need to use a trial-and-error approach to find what suits you best. Whatever method you use, be sure to remove enough moisture from the final product so that spoilage organisms cannot grow.
    When you dry foods, remember the following:
    • Cleanliness and sanitation are essential.
    • The flavor of dried fruits and vegetables will be somewhat different from that of their fresh, canned, or frozen counterparts.