Showing posts with label gardening. Show all posts

Monday, June 14, 2010

Garden Harvest

This has been a busy week!  I was asked to help with an Enrichment activity on Gardening (in particular, Harvesting) to be held in my yard this past week.  I have spent the several weeks putting together this spreadsheet with a lot of information on what to do with the yummy vegetables that we grow.  Hopefully this will be a good reference!  Note: This was made for my altitude (4000-6000 ft). If you use this as a reference, and live at a different altitude, you would need to adjust times, and pressures.
Garden Harvest 4000-6000 ft
Happy Harvesting!

Wednesday, June 9, 2010

Tomato Powder

I recently went to Emergency Essentials to purchase tomato powder.  I about died when I saw the price!  It was $19.99 for a can- on sale!  At Macey's it was $27.99 per can!  I decided that this year, I am going to make my own.  As soon as the garden is plentiful enough, I can use home grown tomatoes.  For now, I  used supermarket tomatoes that were on sale for a great price, so I tried it with them.  It worked great!  What can you use tomato powder for?  Mix it with a little water and you have tomato paste!  Want sauce? Add a bit more water.  It can also be used for pizza sauce (mix 2 parts water, some olive oil, herbs and a pinch of sugar), and spaghetti sauce.  It can also thicken soups, stews, chili, etc.  Throw some in your artisan bread (with rosemary, or basil and garlic... yummmmm...).  Tomato powder is a great thing for your everyday cooking, as well as an excellent food storage item.  It takes much less space to store than the canned products.  It tastes fantastic!  Beware, it can go hard quickly if improperly stored.  Keep it as airtight as possible! Just about any variety of tomato would work. Go for the ones with the most robust flavor.  I can't wait to make this with my own homegrown tomatoes!

Directions: 
  1. Select ripe tomatoes.  Wash and remove stem.  No need to peel.
  2. Cut in thicker slices (1/4-1/3").  If the slices are too thin, for some reason they do not blend up as well.
  3. Dehydrate until very crisp.  In my dehyrator it took about 12 hours (at 130 degrees).
  4. Let cool.  Check for crispness.  They must be completely dry!
  5. Put in blender, and blend away!!  For a chunkier end product (to use with salsa, soups, spaghetti sauce), leave chunks in the powder. For a smoother product, blend until a fine powder is achieved. 
  6. If possible, seal in mason jar with the food saver attachment. 
Note: To shorten the drying time, you can squeeze all the juice out of the tomatoes prior to drying.

Wednesday, March 17, 2010

2010 Square Foot Garden Plan

Here is my 2010 garden plan.  Last year I was able to harvest enough onions to last the winter,  can some beans, and dehydrate lots of peppers.  We simply couldn't keep up with the amount that was ripening.  There is absolutely nothing better than fresh vegetables all summer.  If I would have realized how much I would love square foot gardening, I would have started it 15 years ago!
Garden Plan 2010

Wednesday, March 10, 2010

Square Foot Gardening: Companion Planting

For those of us who are getting really excited to plant our gardens, I found a great tool to use.  One of my favorite websites, www.mysquarefootgarden.net, just posted a great guide on companion planting.  As I am in the process of designing my 2010 garden plan, I am finding it very useful.  Click here to get the guide!  Happy garden designing.....

Even if you don't use a square foot garden, this info would be great in a traditional garden as well!

Saturday, December 5, 2009

Storing Onions


I think one of the best ways to save money on my food budget is to not let food go bad!  Obviously when it goes bad, it must be discarded, therefore throwing money away.  This fall, I harvested about 100 onions from my garden.  Although we love onions, we can't eat that many in the very near future, nor do I have fridge space for them.  A great way to store them to last through the winter months, is to put them in old nylons!  This keeps the air circulating to the onions, as well as keeps them from touching one another.  Simply cut the old nylons in half, so the legs are separated.  Put an onion in, working it to the very toe of the nylon.  Tie a knot.  Put the next one in, etc.  I then tie the two legs back together and hang them in my garage. When you need an onion, just cut the bottom one off!  Stored this way, they will last through the winter months.  Note:  when you are putting the onions in the nylons, make sure you don't put any in that are soft, or that the stems are growing.  They won't last!  Just use them up.

This is also a great way to stock up when onions go on sale.  I saw yellow onions at the grocery store on sale for $3.99 for a 25 pound bag!  Fabulous!  much better than paying .69 cents per pound!

Wednesday, July 1, 2009

Garden Therapy

I don't know about you, but I am really enjoying my garden! I enjoy going out each day and seeing the progress in each plant. It amazes me that these huge plants came from a single seed! This is the first year that I have used a square foot garden. So far, here is what I have learned:
  • To trellis tomatoes, you have to be DILIGENT. If you let them go for a week, it is really hard to get them back on the trellis. I am not sure if I like trellising tomatoes better than using traditional tomato cages.
  • Trellising tomatoes does take less room.
  • Weeds are really kept to a minimum. I have pulled only a handful of tiny weeds out of the gardens.
  • All the plants are growing exceptionally well- better than I have ever had in my traditional gardens.
  • This method really does produce more than the traditional garden. I have way more than what my family of 6 can eat (the neighbors are enjoying it!)
  • If I would have realized how much I loved it, I would have done this 15 years ago.
So far, we have harvested at least 20 zucchini, 10 yellow squash (I only planted one zucchini plant, and one squash plant), loads of peas, romaine lettuce, bibb lettuce, herbs, spinach, swiss chard, and onions. The carrots are about 5 inches long, and the beets are ready to be harvested. I give the square foot garden method a thumbs up.


The peas are about 6 ft. high


Zucchini plant


Yellow Squash


Pole Beans


Romaine Lettuce


Peppers (green, anaheim, jalapeno)


Cantaloupe


Bush Beans (upper left)


Trellis tomatoes


Swiss Chard


Beets


Carrots


Onions


Cucumbers (front), peas (back)


Thursday, May 28, 2009

Thinning the Home Fruit Trees

As a relatively new fruit tree owner (last 2 years) I am trying to keep up with everything that should be done to the trees. This came in my email last week about thinning the fruit on your trees. I thought it was very useful and thought I would share, since it is time now to thin!! It is very hard for me to pluck those little fruits off when I have been so patient to get them.

Utah Pests’ Tree Fruit Advisory, 5-20-09 Page 3

University of Arizona Extension

Residential Growers: Thinning the Home Orchard

Fruit trees must like their job, because when left to their own devices they often produce more fruit than they can handle. Then, home gardeners are left wondering why their fruit aren’t as big or as sweet as those found in Utah’s farm stands and farmers markets. The solution to this problem is in proper pruning and thinning to keep a balance between fruit growth and tree health.

Why thin – The objective of thinning is to balance supply with demand (leaves per fruit) and in the case of apples and pears, to prevent or at least reduce biennial bearing. The goal is to have fewer fruit in favor of larger size, sweeter flavor, and a crop every year.

Supply and demand - For fruits to grow large and sweet, they require lots of energy in the form of carbohydrates. Maintaining a healthy root system and producing adequate new shoots and leaves also requires carbohydrate energy. This energy all comes from photosynthesis in the existing leaves. Too many developing fruits competing for the carbohydrates supply of a limited number of leaves result in lower fruit quality (smaller size, less sugar), weak shoot and root growth, and declining tree health. In the case of apples and pears, this energy drain in combination with plant hormones coming from the developing fruit, signal the plant to produce less flower buds for the following year.

Alternate cropping – Flower buds in temperate fruit trees begin their development the season before they open. For apple and pear, this starts 3 to 6 weeks after bloom. Peach flower buds begin to form 2 months after bloom. The presence of developing apple and pear fruitlets will prevent the short side-shoots known as spurs from initiating flower buds for the next year. If too many spurs set fruit in a given season, then there will be few or no blossoms the following year. This situation is known as alternate cropping or biennial bearing.

When to thin – Most fruit trees will partially thin themselves through natural fruit drop. However, this comes after a lot of energy is wasted on the extra fruit, and after the chance for improving return bloom has past. For best results, apples should be thinned when the largest fruits are between ½ and ¾ of an inch in diameter. Thinning late will help fruit size, but return bloom will be compromised. Peaches and other stone fruits should be thinned when fruits are ¾ to 1 inch in diameter. Stone fruits do not typically suffer from biennial bearing, but waiting too long wastes the plant’s energy and the opportunity to get the largest, sweetest fruit possible.

How to thin – When thinning, pick off the smallest fruits as well as any that are misshaped or damaged. Then adequately space the remaining fruits. Peaches, nectarines and other stone fruits should be spaced out 3 to 5 inches along a shoot. If the trees have not been properly pruned to reduce the amount of fruiting wood, additional thinning may be required to prevent a heavy crop from breaking limbs. To achieve the large sweet peaches that we all enjoy, a moderate-sized peach tree should only produce 100 to 150 fruits on the entire tree.

Apple blossoms come in clusters of five or six and, when pollination conditions are right, may try to produce three or more fruits on each cluster. For best results, apple clusters should be thinned to one fruit, and fruiting clusters spaced 6 to 8 inches apart.

Wednesday, May 20, 2009

Fruit Tree Trauma

So I learned a hard, but valuable lesson this week. I went out as usual yesterday to check on the fruit on my 5 fruit trees that were planted last fall. Last Wednesday I sprayed all the trees with the appropriate spray to protect from pests. I was a bit nervous doing so, as I have never had fruit trees and wanted to do everything right. I carefully measured, mixed and sprayed the recommended amount on each tree. I even added spreader sticker so the pesticide would really stick to each leaf and fruit.

You can imagine my shock as I went out yesterday and all the leaves were falling off my trees! The leaves were turning brown and crunchy, curling lengthwise and into the letter "C". Panicked, I called the USU Extension Master Gardeners. The first question they asked me was if I had ever had any other type of chemical in my sprayer. Uh-Oh! Last year I used the same sprayer to spray dandelions with 2-4-d Amine, a broadleaf weed killer. Although I rinsed the canister very well, and even sprayed water through it, I guess there were chemicals still in the plastic. They said it doesn't take much of the weed killer to really damage the tree.

So, the lesson I learned: Never use the same sprayer for fruit trees and weed killer. I wish I would have learned that lesson the easy way. I am hoping that the trees will not completely die. USU said I won't know for about a month. If all the leaves fall, the fruit cannot mature. The leaves give the fruit the starch it needs to grow and develop. So, if they do pull through, I will buy a new sprayer that will only be used to spray my trees.

Monday, May 11, 2009

Tomato Tips

My mom has the most BEAUTIFUL tomatoes that I have ever seen. The plants themselves are thick, lush green, and the tomatoes are the size of grapefruits. She has an amazing yield. Each year as I compare my tomatoes to her, I simply can't believe that I even planted the same varieties! I asked her the secret. She said that her secret is in the fertilizer. After trying many different fertilizers, she found one makes her tomatoes the envy of the neighborhood. The only kind of fertilizer she uses now is "Fertilome Blooming & Rooting Soluble Plant Food (9-59-8)". She mixes 2 TBS with 1 gallon of water and uses this mixture for all of her vegetables and flowers throughout the growing season. She said to make sure the tomato plant is established (in ground for 1-2 weeks) before applying the fertilizer. Then, fertilize every 10-14 days. If you could only see her tomatoes!! I am on my way to go buy some of the fertilizer in hopes I have the same success!

Here are some more tips from USU extension services when it comes to tomatoes:
  • Tomatoes are categorized by maturity class (early, mid-season or late), fruit shape or size (cherry, pear, plum or large), plant size (determinate, semi-determinate or indeterminate), fruit color (red, pink, yellow, orange) and use (fresh, process or dual use). When selecting varieties, consider the growing environment, primary use and available growing space. Most garden centers and nurseries carry varieties that have been proven to grow well and produce high quality, flavorful fruits for local conditions.
Note: For square foot gardening, you will want to choose indeterminate plants that you can trellis.
  • Tomatoes can be grown from seeds or transplants. Transplants should have five to seven mature leaves and a well-developed root system. Transplants mature about four weeks before seeded tomatoes and are recommended for most growing areas in Utah. Tomatoes prefer a sunny location and fertile, well-drained soils. Incorporate plenty of organic matter and a complete fertilizer into the area before planting.
  • Plant tomato seeds directly in the garden 10-14 days before the last frost date. Plant four to five seeds ½ inch deep at the recommended plant spacing and later thin the weaker plants. Most gardeners transplant tomatoes through black plastic for earlier maturity. Use row covers or hot caps to protect the plants when planting before the frost-free period. Space tomatoes 2 feet apart in the row with rows 2-3 feet apart.
  • Plant three to four tomato plants per person for fresh use and an additional five to 10 plants for juicing, canning or freezing. Expect 100 lbs. of fruit per 100 feet of row.
  • Irrigation should be deep and infrequent. Apply 1-2 inches of water per week. Use drip irrigation if possible. Place mulch around the plant to conserve soil moisture and reduce weed growth. Do not apply organic mulches until soils have warmed to 75 F. Irrigate so that moisture goes deep into the soil. Irregular watering (over or under) can cause blossom-end rot, a dark leathery spot on the bottom of the fruit.
  • Use wooden stakes or wire cages to support semi- or indeterminate plants. Staking helps reduce sunburned fruits and keeps ripening fruits off the ground. Drive stakes 18 inches into the soil, 3-4 inches from the stem. Indeterminate varieties require more support and vine pruning to keep plant size manageable. Continue to tie up plants as they grow.
  • Control insects and diseases throughout the year. Common problems are tomato horn worm, aphids, fusarium and verticilium wilt. Always identify the problem before using a pesticide. Your local county Extension office can help identify the problem and offer solutions.
  • Tomatoes require 25-35 days to mature from flowering, depending on the temperature and variety. For best flavor and quality, pick fruits when they are fully colored but firm, and pick as they ripen. At the end of the season, harvest all fruits that are mature green or slightly colored. Store at 55 F and use as they ripen. Ripe tomatoes will store for one to two weeks if held at 50-55 F. Fruits are subject to chilling injury, so do not store them for more than a few days in the refrigerator.
The following are answers to tomato questions:

Q: What causes the flowers to drop off my tomato plants?
A: During unfavorable weather (night temperatures lower than 55 F or day temperatures above 95 F), tomatoes do not set and flowers abort. The problem usually disappears as the weather improves.

Q: What can I do to prevent my tomatoes from cracking?
A: Some varieties are more prone to cracking than others. Many newer hybrid varieties are quite resistant. Severe root or vine pruning increases cracking. Keep soil moisture uniform as tomatoes develop and plant resistant varieties to minimize the problem.

Q:
On some of my tomato plants, the leaves are turning yellow and the plants are no longer growing. Also, the fruits are ripening prematurely, and are leathery and bitter. What is wrong?
A: Tomatoes with these symptoms are infected with the curly top virus, a disease transmitted by the beet leaf hopper. Once infected, there is very little you can do. Since the severity of curly top varies from year to year, planting a few more plants than required will compensate for potential losses. Plant varieties resistant to curly top include Roza, Columbia, Rowpac and Saladmaster.

Q:
Why are the new leaves on my tomato pointed, cupped, twisted and irregular in shape?
A: Your tomatoes may have been injured by 2,4-D or a similar growth regulator weed killer. Never use the same sprayer in your vegetable garden that you use for weed control in your lawn. Use caution when applying lawn care chemicals near vegetables or fruits. If applying grass clippings to the garden, make sure the herbicides used are safe for food plants. Consult with your lawn care professional to ensure the chemicals applied to your lawn will not affect your edible garden plants.

Friday, May 8, 2009

Garden Delight

I asked my husband the other day if it was weird that I get so excited by my garden! Each day when I go out and look at the little seedlings coming up, it really makes my day! It is very fulfilling to me. I get so excited to spend time getting it planted, watered, etc. Hopefully my enthusiam will last the whole growing season. I haven't got my irrigation system figured out yet. Today I will go and talk to the folks at the irrigation store to get some help. I have always used a drip system in my garden, but now since I am doing square foot gardens, I am not sure that is the best way.

It is time to get planting! It is not too late to plant lettuce, peas, radishes or other cool weather crops. And now it is time to get everything else planted! I always jump the gun a bit and plant earlier than is recommended. This year I got burned. We had a hard freeze several days after I planted. I covered the garden with black plastic, but I still lost 3 tomato plants and 3 cucumber plants. However, even having to replace a couple of plants, everything is coming up beautifully. So far the only things that have not come up are my canteloupes, and several beans which I will reseed tomorrow.

For square foot gardening, here are the totals per square for different seeds:
Plant (#per square)
Asparagus (1)
Basil (4)
Beans, Pole (8)
Beans, Bush (9)
Beets (9)
Broccoli (1)
Cauliflower (1)
Carrots (16)
Cilantro (4)
Corn (4)
Cukes (2)
Dill (4)
Eggplant (1)
Lettuce (4)
Okra (1)
Onions (9-16)
Oregano (1)
Parsley (1)
Peas (8)
Peppers (1)
Potatoes (4)
Radishes (16)
Rosemary (1)
Spinach (9)
Swiss Chard (4)
Tomatoes Vine (1)

Plant (#of squares)
Cantaloupe (2)
Pumpkins (2)
Summer squash (9)
Bush Tomatoes (9)
Watermelon (2)
Zucchini (9)

Some links on square foot gardening:
www.mysquarefootgarden.net
www.squarefootgarden.com

Happy Planting! Even if you don't want to plant a huge garden, plant some pots! It is amazing how much fun growing can be!


Beans, eggplant, beets, carrots and lettuce. Some are ready to snip (I planted 2 in each hole-and they all germinated!)The small trellis we made for a few tomato plantsPlanting in pots works great. Chives, rosemary, strawberries, rhubarb & tomatoes Not shown: around the trunks of my trees I plant basil, oregano and thyme.While planting, I planted a bunch of flower pots as well. What a difference they make in my yard!

Cucumbers (top row)
Spinach (bottom row)


Below: My "Salsa" garden: peppers, jalepenos, anaheims, and some garlic and lettuce too!


Tuesday, April 21, 2009

Garden Plan 2009

After much consideration, planning, and hard work, our new square foot gardens are ready to plant! Yippee!

Because things took a bit longer than we thought, I am afraid that our "cool weather" crops are going to have a very short growing season. Darn! The good thing is, as soon as those crops are harvested, in goes more warm weather plants! After the peas are harvested, here comes acorn squash!

This year I decided to plant large amounts of beans, both pole and bush. The bush beans tend to come on at the same time, perfect for canning! My kids for some reason don't like fresh beans (they claim they are hairy!), but they loved canned, so out will come the pressure canner. The pole variety will give me fresh beans all season. Yummy!

I was a bit worried that with the square foot garden we wouldn't be able to plant as much. As I have been figuring out my plan, I am astounded at how many plants I can have! Hopefully it will turn out as planned. I even ventured out and will plant a couple things I have never before planted: garlic and eggplant!

Carrots (16) Beets (16) Beets (16) Pole beans (8)

Lettuce (4) Romaine Lettuce (4) Red Leaf Beets (16) Cantaloupe (1)
Carrots (16) Beets (16) Beets (16) Pole beans (8)

Lettuce (4) Romaine Lettuce (4) Butter Beets (16) Cantaloupe (1)
Carrots (16) Eggplant (1) Eggplant (1) Pole beans (8)

Pepper (1) Pepper (1) Pepper (1) Cantaloupe (1)
Onions (9-16) swiss chard (4) swiss chard (4) Pole beans (8) Trellis
Pepper (1) Pepper (1) Pepper (1) Cantaloupe (1) Trellis
Onions (9-16) swiss chard (4) swiss chard (4) Pole beans (8)

Jalepeno (1) Jalepeno (1) Jalepeno (1) Peas (8)/ winter squash
Onions (9-16) Spinach (9) Spinach (9) Cukes (2)

Jalepeno (1) Anaheim Pepper (1) Anaheim Pepper (1) Peas (8)/ winter squash
Onions (9-16) Spinach (9) Spinach (9) Cukes (2)

yellow beans (9) yellow beans (9) Marigold Peas (8)/ winter squash
Marigold

Cukes (2)

Garlic (4) Garlic (4)
Peas (8)/ winter squash

Bush beans


Bush beans Zucchini
Bush beans


Bush beans


Bush beans
Yellow squash

Bush beans


Tomato (Roma-D) Tomato (Roma-D)


Tomato (super Fantastic-I) Tomato (super Fantastic-I)


Tomato (Better Boy-I) Tomato (Better Boy-I)


xx xx House (East)


Tomato (sweet 100) Tomato


Tomato (Better Boy-I) Tomato

Thursday, April 16, 2009

Getting Anxious

For the past several weeks, I have been working soooo hard to get ready for gardening! In years past we have had a raised garden that had wood beams supporting it. This past year, they were almost disintigrated. The garden was falling apart!

After researching square foot gardening, I decided that I wanted to do that method! So, for several weeks, we hauled off 3 trailers full of dirt (our existing garden). The main reason that I wanted to try the SFG method was to get rid of the weeds! It seems that I am always gung-ho about gardening until the weeds start taking over EVERYTHING in my garden. Seriously, they come up like carpet. Last year I spent at least an hour each day, and still couldn't keep up. So, after the dirt was hauled off, my husband and I got to work.


Our garden area after all the dirt has been hauled away.


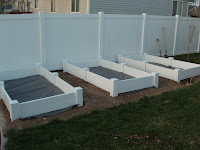
Supplies for the garden boxes. We ordered the vinyl material from Best Vinyl, a vinyl fence company.


The first garden box put together.


All three boxes set, leveled and weed paper put down.


I was so looking forward to mixing up the "mix" today. Unfortunately, we woke up to 6" of snow! I guess it will wait until tomorrow....


Pile of compost ready to be mixed
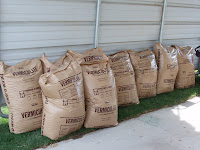


9 bags of vermiculite for the mix


4 bags of peat moss to add in


Lessons I have learned thus far about square foot gardening:

1. It is a lot of work to get going.
2. It is very expensive to get going.
3. You don't need to have your corner posts more than about 6" into the soil. We ended up sawing off the posts because it was too hard to get the holes dug in our clay soil deeper than that.

Things I am hoping for with our new gardens:
1. Weeds will be kept to a minimum.
2. I will get as much or more harvest.
3. I will not have to spend as much time gardening.

Total costs:
3 4x8 foot vinyl gardens, each 10" high: Approximately $420
Compost (1.5 cubic yards): $38
Vermiculite (9 bags, each 3.8 cubic feet): $180 plus tax
Peat Moss (4 bags, each 3.8 cubic feet-they expand to 7+ cubic feet when opened): $60 plus tax
Weed Paper: $33

Total cost: $731
Cost per garden: $244