 I love tomatoes! This year my Roma plant over did itself. I had sooooo many tomatoes that I wanted to try making my own sun-dried tomatoes. They are very expensive in the stores! The website www.pickyourown.org gives great instructions as to making your own. I followed their instructions below and was very pleased. So, here they are....
  1. For best results, select Roma tomatoes that are not overripe. You can use other types of tomatoes, but they are juicier, and harder to prepare. They also take longer to dehydrate. You get about 2 cups of sun dried tomatoes for every 5 pounds of fresh.
2. Wash and stem the tomatoes. Remove any bruised spots.
3. Cut in half lengthwise.
 4. Using thumbs, remove the seed bundle on each side of the middle. This leaves the meaty part only.
Now, you have 3 options on how to dry them:
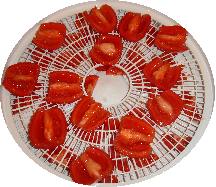
- Food dehydrator: Arrange the pieces on each rack so that air can circulate, preferably with the pieces not touching each other, but there's no need to become obsessive about it. Some people prefer to sprinkle the tomatoes with sea salt, kosher salt and/or some spices (typically basil). Turn the dehydrator on and enjoy the aroma. If your food drier has a thermostat, set it for 140 degrees F. It will take 3 to 8 hours. See "how to tell when they are done" in step 5, below.
- Oven:
 preheat the oven to 200 degrees F . Arrange the tomatoes on jelly roll sheets, spread out, not touching each other. Cake racks will also work well. Some people prefer to sprinkle the tomatoes with sea salt, kosher salt and/or some spices (typically basil). Close the oven. It takes about 6-8 hours, but you'll need to check periodically, including rotating the shelves and moving them up or down to get even heating. See "how to tell when they are done" in step 5, below.
 - Automobile and a hot sunny day: It sounds strange, but the same stifling hot car that burns your legs makes an excellent food dryer. Spread the tomato slices out on shallow trays (they work better than cookie sheets, since you don't need to worry about leaking juice!). Cover them loosely with cheesecloth to keep any potential for bugs to come in contact. Put the trays on the dashboard of your car and roll all the windows up and park in the sunniest spot you've got. It's best to start in the morning and let it go to sunset. It may take 2 days - bring the tomatoes in the house overnight. Some people prefer to sprinkle the tomatoes with sea salt, kosher salt and/or some spices (typically basil). but you'll need to check periodically. See "how to tell when they are done" in step 5 below.

 The amount of time it takes depends on the water content of the tomatoes, the thickness of the slices, and how well the air is able to circulate around them. When done, the tomatoes should be flexible, like a fresh raisin; not brittle. Most describe them as leathery with a deep red color, without free water or a tacky feeling.
6. Storage: If you have a vacuum sealer, use it! The tomatoes will last much longer this way. Otherwise, use the ziplok type bag. Try to get as much air as possible out.
Keeping in the freezer is best, there the dried tomatoes will retain their color and flavor for about 9 to 12 months. A fridge is ok for a few weeks, but if there is much moisture left in them, they WILL start to get moldy in a month or so. The vacuum bag food sealers really help to increase the longevity of dried tomatoes in the fridge with their vacuum sealing!
Dried tomatoes quickly reabsorb moisture, so be sure your containers really are airtight. If they re-absorb moisture, they may then go moldy. If they are still too moist, they will also go moldy.
Check the newly packaged dried tomatoes daily for about a week to make sure there isn't any condensation in the containers. If you see any moisture in the containers, remove the tomatoes immediately, put them back in the food dryer and resume the drying process.
Notes about packing in oils:
If you like to have your dried tomatoes in a seasoned oil, such as olive oil with basil, thyme, oregano and/or minced or powdered garlic or garlic salt, it is best to do this when you are ready to eat them, or shortly before, and refrigerate them. There aren't many university studies about the safety of home-dried tomatoes packed in oil, but the information that's available suggests that it is best to just do that as you use them or make up small batches and refrigerate them.
No comments:
Post a Comment