Tuesday, July 20, 2010

Organizing "stuff"

It seems that in my house, every inch has to be used efficiently to maximize space.  One thing that I LOVE to use is shoe holders!  However, I don't use them for shoes.  I hang them on the backs of my doors for various things.  In my front closet, the pockets hold various seasonal things.  In the summer it holds hats, sunscreens and other things that the kids can come get. In the winter, the pockets hold mittens, scarves, ear warmers etc.  Each kid has a whole row for themselves, so they always know where their stuff is.

In the bathroom, the organizer holds bows, barettes, hairsprays, brushes, combs, etc.  I like the clear ones so I can see exactly where everything is.This is especially helpful as the kids know where each thing goes- and they can put it away where it goes.

In my kitchen pantry, the organizer holds our cell phones, chargers, sunglasses, ipods and all the little electronic gadget-y things that I use in the kitchen and with my computer in the kitchen.  I know the pantry seems an odd place for this, but that is where I use it.

These wonderful shoe organizers have helped us save space, and be organized.  Each one is only about $7-9.00 at Walmart or Target.

Thursday, July 15, 2010

"Hard Boiled" Eggs in Solar Oven

Can your solar oven do this?  Wow! 

Simply put eggs in black enamelware pot.


Put in preheated solar oven.  Let cook for about 30 minutes (35 for extra large eggs).  They are PERFECT hard boiled eggs!  And even better, there is no green ring around the yolk!  Have I said how much I love using my sun oven?

Sunday, July 11, 2010

Sealing Mylar Bags (Food Storage)

After attending a class given by the director of the LDS dry-pack canneries, I decided I would try to incorporate more mylar bags into my food storage.  Why? Mylar keeps light and air out better than plain old 5 gallon buckets.  Since I store much of my bulk items (oats, flour, rice, etc) in 5 gallon buckets, this will extend the shelf life considerably. 

Put mylar bag inside 5 gallon bucket.  I ordered my mylar bags online.


Put product in bag.  Fill it a bit more than what you think will fit.


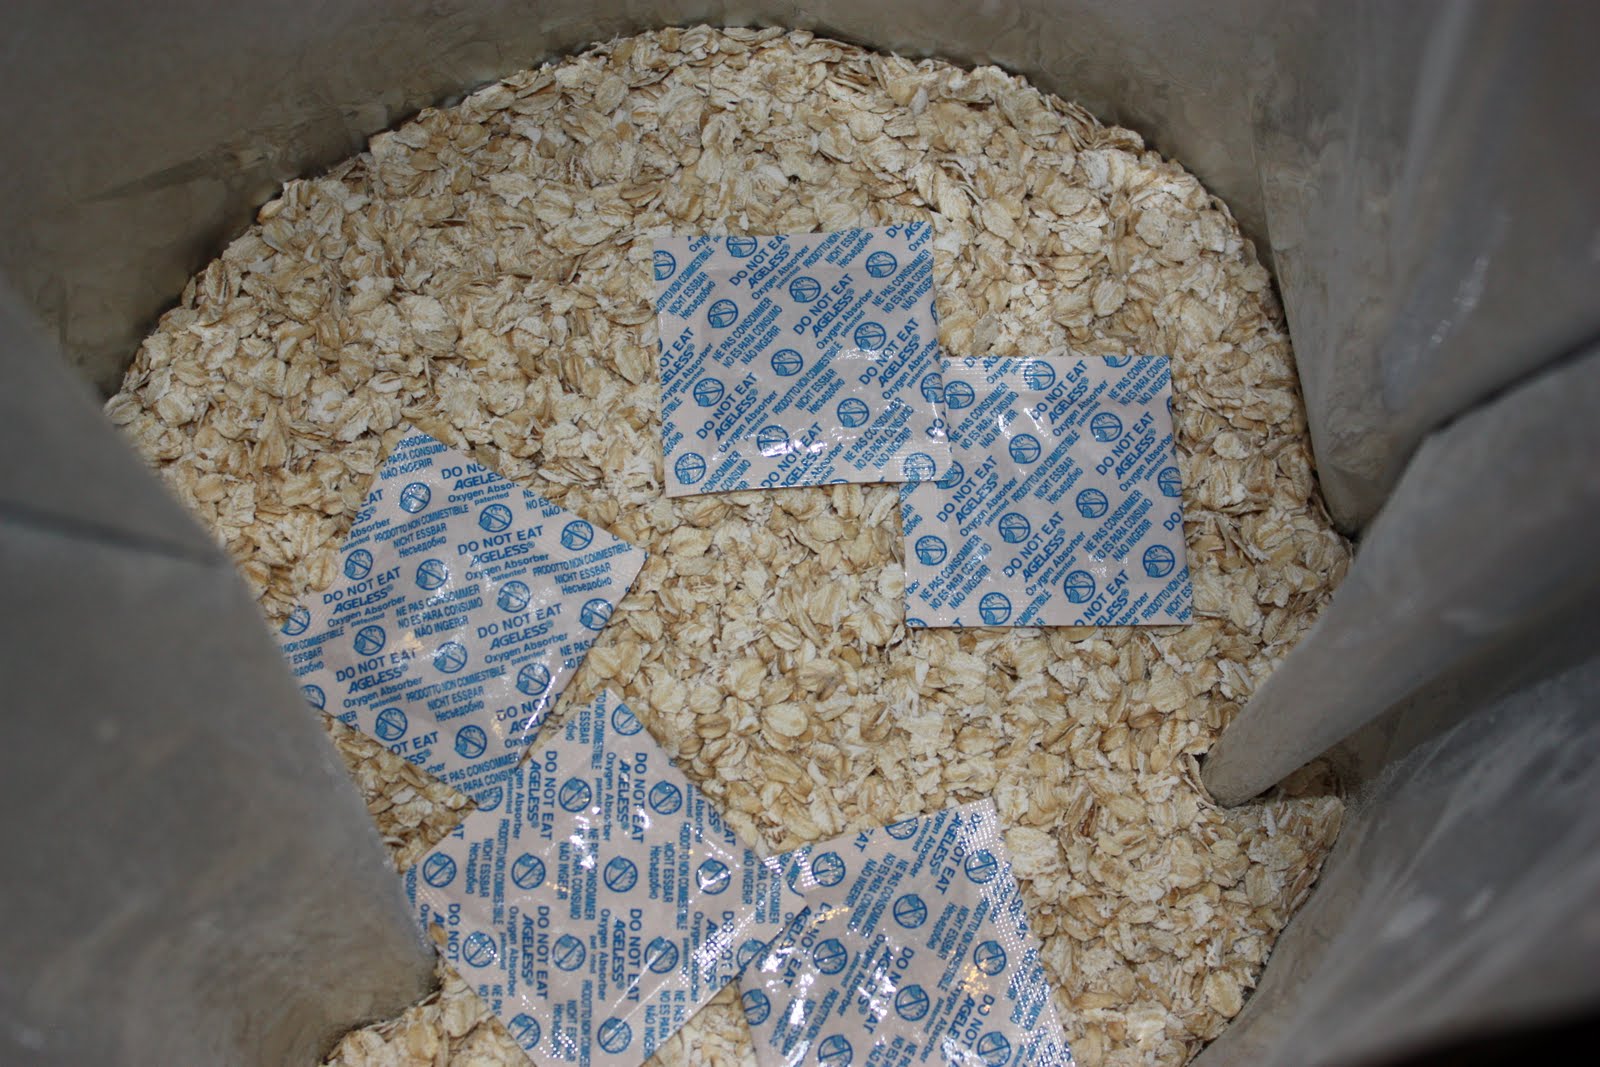
Add oxygen absorbers.  You need to add 1 absorber per gallon of product.  So, if you are using a 5 gallon bucket, use 5.


Try to get as much air out as possible.  Now, straighten the seams of the bag.  Lay flat on surface of bar or ironing board.  Using medium high heat, seal across top, leaving the corner unsealed.


Smash as much air out as you can.  Now seal the corner.

Leave for 24 hours.  The product should be hard now, as the oxygen has been absorbed.  Put lid on, label and store.

Tuesday, July 6, 2010

Homemade Laundry Soap

Our stake recently had an opportunity to purchase supplies to make our own laundry soap.  I finally got around to doing it. I must admit, I am a laundry soap snob, and really like Tide products.  However, I really don't like paying for Tide products.  So, I thought I would give it a try.  I told myself that as long as my clothes are clean, I would be OK.  The thing that I was most excited about was the cost!  It ends up costing about .70 cents per BATCH, and each batch makes 2 gallons.  You only use 1/2 cup of detergent per load.  The final cost is  approximately .01-.02 cents per load.  WOW!  However, if you are unable to order the bulk quantities, it will cost more than that.  Even paying retail for products at the grocery store, the homemade stuff is only a fraction of the cost.  Our supplies (borax and soda) came from www.brenntag.com in Odgen, UT.  A 50 pound bag of borax was $24.17, and a 50 pound bag of washing soda was $11.50.  This also included shipping.  I purchased the Fels Naptha bar at Macey's grocery store for $1.59.


The recipe:
1/3 bar Fels Naptha or other type of laundry bar soap
1/2 cup washing soda (It MUST be washing soda- baking soda will NOT work!)
1/2 cup borax powder
*You will also need a small bucket, about 2 gallon size*
(I tripled the recipe and did it in a 5 gallon bucket.  Obviously if each batch makes 2 gallons, and I tripled it, that would be 6 gallons.  I omitted 1 gallon of water, making it a little stronger concentration.  Hence, I use a bit less than 1/2 cup per load).  

Directions:
Grate the soap and put it in a sauce pan.  Add 6 cups water and heat it until the soap melts.  Add the washing soda and the borax and stir until it is dissolved. Remove from heat.  Pour 4 cups hot water into the bucket.  Now add your soap mixture and stir.  Now add 1 gallon plus 6 cups of water and stir.  Let the soap sit for about 24 hours and it will gel.  You use 1/2-3/4 cup per load.  You can also add some "blueing" agent for whiter whites, available at most stores on the laundry aisle.  I did not do that.  The verdict?  After trying the soap on colors and whites- I really like it!  The clothes smell nice- a good clean smell.  The fresh Wendy's Frosty stain on my sons shirt is gone.  Everything looks good!


A few things to not about the soap:
  1. The finished soap will not be a solid gel.  It will be more of a watery gel that has been accurately described as an "egg noodle soup" look.
  2. The soap is a low sudsing soap.  So if you don't see suds, that is ok.  Suds are not what does the cleaning, it is the ingredients in the soap.
  3. If you want your soap to have some sort of scent you can add 1/2-1 oz of essential oil or fragrance oil to your batch.  
  4. You can pour into empty milk jugs and store that way.
     
Grated Fels Naptha


Borax 


Washing Soda (It MUST be washing soda!  Baking soda will NOT work!!)


Fels Naptha Bar


The Fels Naptha and water in pot. 


The finished product before putting in gallon jugs.

Thursday, July 1, 2010

Earthquake Preparedness

Several of my friends and I get together monthly to discuss and implement emergency preparedness ideas.  This past week we discussed EARTHQUAKES!  Since we live on the Wasatch Front, home to the Wasatch Fault, this is a very real threat to us.  Below are the handouts we received.  They are wonderful!  Thanks to my friend Jenni who put them together for us.

This first one was taken from an area fireside on Earthquakes.  Here are her notes:
Earthquake Fireside

This second one is filled with fabulous information taken from the North American Emergency Management team.  Good Stuff!!

Home Earthquake Information
This last one is a list of resources on the web for more information.  It is one thing to read about and gather information about preparedness.  It is another thing to implement what we learn!  Lets get to it!!
Earthquake Resources

Monday, June 14, 2010

Garden Harvest

This has been a busy week!  I was asked to help with an Enrichment activity on Gardening (in particular, Harvesting) to be held in my yard this past week.  I have spent the several weeks putting together this spreadsheet with a lot of information on what to do with the yummy vegetables that we grow.  Hopefully this will be a good reference!  Note: This was made for my altitude (4000-6000 ft). If you use this as a reference, and live at a different altitude, you would need to adjust times, and pressures.
Garden Harvest 4000-6000 ft
Happy Harvesting!

Wednesday, June 9, 2010

Tomato Powder

I recently went to Emergency Essentials to purchase tomato powder.  I about died when I saw the price!  It was $19.99 for a can- on sale!  At Macey's it was $27.99 per can!  I decided that this year, I am going to make my own.  As soon as the garden is plentiful enough, I can use home grown tomatoes.  For now, I  used supermarket tomatoes that were on sale for a great price, so I tried it with them.  It worked great!  What can you use tomato powder for?  Mix it with a little water and you have tomato paste!  Want sauce? Add a bit more water.  It can also be used for pizza sauce (mix 2 parts water, some olive oil, herbs and a pinch of sugar), and spaghetti sauce.  It can also thicken soups, stews, chili, etc.  Throw some in your artisan bread (with rosemary, or basil and garlic... yummmmm...).  Tomato powder is a great thing for your everyday cooking, as well as an excellent food storage item.  It takes much less space to store than the canned products.  It tastes fantastic!  Beware, it can go hard quickly if improperly stored.  Keep it as airtight as possible! Just about any variety of tomato would work. Go for the ones with the most robust flavor.  I can't wait to make this with my own homegrown tomatoes!

Directions: 
  1. Select ripe tomatoes.  Wash and remove stem.  No need to peel.
  2. Cut in thicker slices (1/4-1/3").  If the slices are too thin, for some reason they do not blend up as well.
  3. Dehydrate until very crisp.  In my dehyrator it took about 12 hours (at 130 degrees).
  4. Let cool.  Check for crispness.  They must be completely dry!
  5. Put in blender, and blend away!!  For a chunkier end product (to use with salsa, soups, spaghetti sauce), leave chunks in the powder. For a smoother product, blend until a fine powder is achieved. 
  6. If possible, seal in mason jar with the food saver attachment. 
Note: To shorten the drying time, you can squeeze all the juice out of the tomatoes prior to drying.

Tuesday, June 1, 2010

Homemade Pizza Sauce

Mmmm, Mmmmm, Mmmmmm!  We love pizza!  Every Friday night at our house is homemade pizza night.  The kids generally make it themselves now, and it turns out delicious each time.  This is a recipe for pizza sauce that we really like.  Why pay $2.69 for a jar when this tastes even better at a fraction of the cost?

Pizza Sauce:
16 oz tomato paste
18 oz tomato sauce
1/2 tsp thyme
1 tsp garlic salt
1/2 tsp salt
1 tsp oregano
1/2 tsp Worcestershire sauce

Mix together.  Will do (2 )13-16 inch pizzas.  We like to heat it up and dip breadsticks in it too!  Enjoy!

Tuesday, May 25, 2010

My Home Energy Audit

One great way to see if you are conserving energy (and money) is to schedule a Home Energy Audit.  Check with your power company to see if they offer them.  If you live in Utah, here is the link. Questar Gas sent an auditor out to my home and he spent nearly 2 hours looking at everything!  I was a little nervous to see what he would have to say.... Yay!  It was good news!  We are energy efficient on most things.  He gave some great suggestions (as well as supplying some pipe insulators and a water heater blanket for free!).  All in all, it was great.  Questar charges $25 for the audit, and then they refund it if you take any of their suggestions.  Not bad!  He then spent time explaining each of the different things to look for and do to make our home more efficient.  He left us with a custom printed report for our home with suggestions, and costs to implement these suggestions, and how long it would take to recoup the savings.  I highly recommend this audit!

Saturday, May 22, 2010

Homemade Croutons

For years I've made croutons, and never really thought anything about it. It was just something I did with day-old (sometimes week-old) bread, rolls, hot dog buns, etc. The prep time is minimal and they taste delish! Much better than any packaged croutons I've ever tried. Try them on salads, soup, or eat them by the handful. I store them in a ziplock bag in the freezer. Pull them out right before you serve dinner and they're ready to go.

Croutons
8 slices "homemade" type bread - use day old for best results
4 TB vegetable oil
4 TB butter
onion powder
Garlic salt

Preheat oven to 350 degrees. Using a serrated knife, cut bread into 1- to 1 1/2-inch cubes. Put oil and butter on a large rimmed baking sheet and place in oven until butter melts. Remove baking sheet from oven and sprinkle with onion powder and garlic salt to taste. Sprinkle bread cubes over melted butter and lightly toss until most of the bread is coated in the butter. (I use a large pancake turner and just scoop the bread and flip it over.) Bake about 20-30 minutes, stirring every 10 minutes or so, until bread is toasted and dry. Cool on baking sheet. Store in ziplock bag in the freezer.

Notes:
1) Almost any type of bread works for croutons EXCEPT bread with whole grains (like wheat berries) mixed into the dough. The grains get very hard. I also have not had good success with using the dinner rolls from Sam's Club to make the croutons - the croutons never dried out. Perhaps it's because I live in a high humidity area? No idea.

2) The baking time is approximate because all types of bread have a different moisture content. If the croutons are getting brown but aren't getting crisp, turn down the heat in your oven and prop open the oven door just a crack with a wooden spoon.

3) I've made croutons with all different seasonings and spices including season salt, parsley, sage, rosemary, etc. All are good, but for a basic crouton that will go with anything, the onion powder and garlic salt really can't be beat.